
An LVL beam hanger is the metal connector that carries a beam or joist end on the face of another member; it works only when its model matches the beam size and every nail hole the hanger maker specifies is filled. A sound LVL beam install also needs full bearing, plies fastened to the producer's schedule, no field notches and dry service. This guide from Minh Thanh Plywood, a Vietnamese LVL and plywood manufacturer, sets out those steps from published manufacturer notes.
LVL beam install: what the job involves
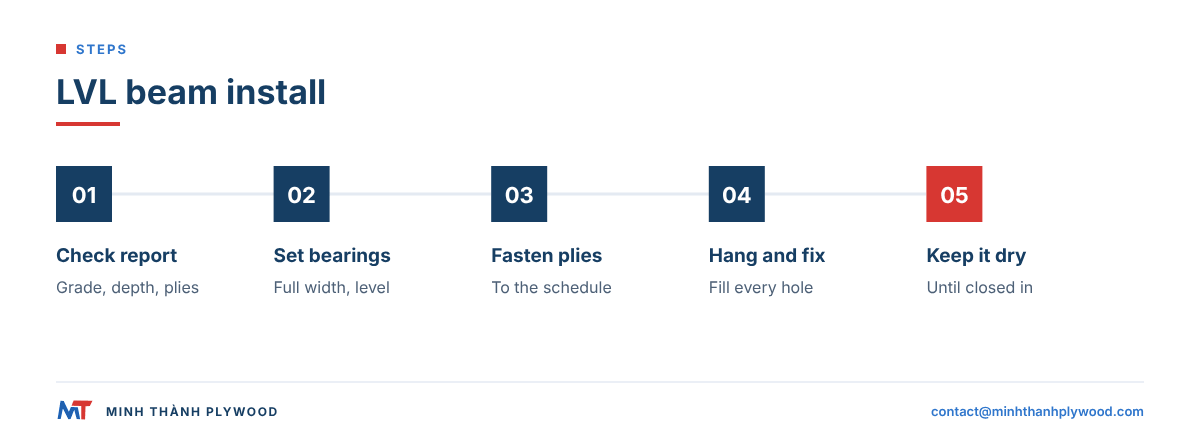
An LVL beam install is five jobs done in order: check the beam against the report, set the bearings, fasten the plies, connect the beam with the right hangers or post caps, and protect it from water until the building is closed.
Laminated veneer lumber (LVL) is engineered wood made from thin veneers glued with the grain running along the member, so it is straighter and more uniform than sawn timber. That uniformity only pays when the installer follows the producer’s literature.
Every number in this guide comes from published manufacturer notes, dated and linked. It is not an engineering design. Your beam’s size, ply count, fastener schedule and hanger model come from the producer’s tables, its sizing software report or the engineer of record.
What is an LVL beam hanger and when do you need one?
An LVL beam hanger is a formed steel seat that carries the end of a beam or joist on the face of a supporting member, a girder, a ledger or a post. You need one wherever the beam end does not sit on top of a wall, post or column.
Two hanger families cover most jobs:
- Face-mount hangers nail to the side of the carrying member. They suit beams that frame flush with the top of a girder.
- Top-flange hangers hook over the top of the carrying member, with flanges nailed down into it. They suit cases where the girder top is accessible and the side is short of nailing room.
Three rules decide whether a hanger works:
- The model matches the member. Hanger seats are sized to actual widths. One 1¾ in. LVL ply is wider than a sawn 2× member, so a hanger sized for the narrower sawn member is too narrow for it.
- Every specified hole is filled. Load ratings assume all face, top and joist nails. Leaving holes empty is the most common hanger fault.
- The fasteners are the listed ones. Nail diameter and length set the rating. A shorter nail used to avoid poking through a thin carrying member lowers the capacity.
Which LVL beam hanger fits which beam size?
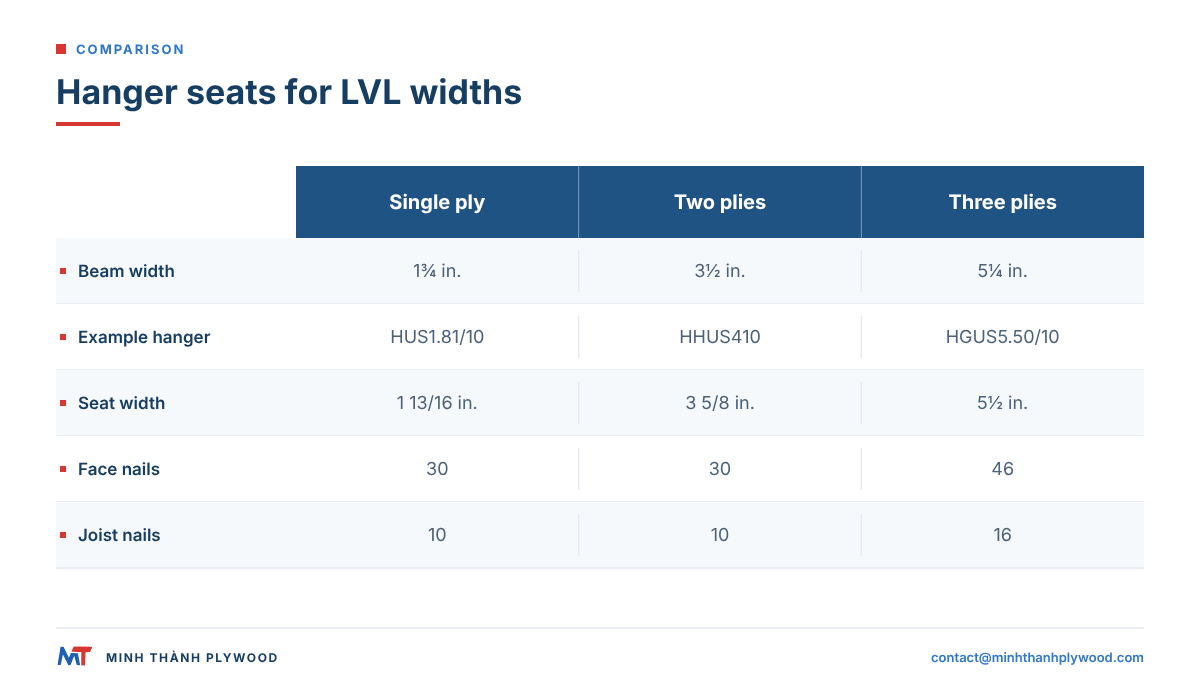
Pick the hanger by the finished width of the beam, then by its depth. The table lists Simpson Strong-Tie face-mount models for the common LVL widths, with the seat width, seat height and nail count from Simpson’s 2021 wood construction connector catalog; the Home Depot listing for the HUS1.81/10 describes it as a hanger for a 1-3/4 in. × 9-1/2 in. engineered wood beam (read 21 October 2026).
| LVL beam | Example hanger | Seat width | Seat height | Face nails | Joist nails | Notes |
|---|---|---|---|---|---|---|
| 1-3/4 in. single ply, 9-1/2 in. deep | HUS1.81/10 | 1-13/16 in. | 8-7/8 in. | 30 | 10 | HUS1.81 series continues for deeper beams |
| 3-1/2 in. 2-ply | HHUS410 | 3-5/8 in. | 9 in. | 30 | 10 | HGUS410 takes 46 face and 16 joist nails for heavier loads |
| 5-1/4 in. 3-ply | HGUS5.50/10 | 5-1/2 in. | 8-15/16 in. | 46 | 16 | HHUS5.50/10 has 30 face and 10 joist nails |
Nails are 0.162 × 3-1/2 in. in all rows. Where the top of the carrying girder is open, top-flange families (the ITS, WP and HB series are examples) hook over the girder and are sized by the same beam widths.
Allowable loads depend on the carrying member, the load direction and the nail count, so check the maker’s current catalog or connector selector for the load and nailing of your beam before ordering. Choose hangers with a current ICC-ES evaluation report or the maker’s code listing for the model code you build under, such as the IRC in most US houses. Our Acacia and Eucalyptus LVL is cut to the section schedule you send, so a project that needs 1-3/4 in. plies can state it on the quote.
Installing an LVL beam: the steps in order
Installing an LVL beam follows the same sequence on most jobs, whether the beam is a header, a flush floor girder or a ridge.
- Read the beam report. Note the grade, the depth, the ply count, the bearing length at each end, the connection detail and the hanger models.
- Check the delivered beam. Measure width and depth, read the stamp or label, and confirm the length allows the full bearing at both ends.
- Prepare the supports. Posts, columns or wall plates must be plumb, level and wide enough for the bearing length, with continuous support down to the foundation.
- Fasten the plies on the ground. Lay the plies flat, line up the top edges and crowns, and nail or screw them to the schedule before lifting.
- Lift and set the beam. Lift with slings on the wide faces, never on the edges with chains. Set the crown or ‘top’ mark up.
- Fix the bearings. Nail or strap the beam to the post cap or wall plate as the report shows, and add any blocking for lateral support.
- Install the hangers. Fix the hangers to the carrying member first, set the beam or joists into them, then fill every listed hole.
- Restrain the top edge. Floor or roof sheathing and joists brace the compression edge; until they go on, keep temporary bracing in place.
- Inspect before covering. Count nails in hangers, check bearings and look for any field cuts that were not on the drawings.
- Protect the beam. Keep it dry until the roof and walls close in.
How much bearing does an LVL beam need?
The bearing length is set by the beam’s reaction and the crushing strength of whatever it sits on, so it varies by job and comes from the producer’s specifier guide or software.
Weyerhaeuser points buyers to the bearing tables in its Trus Joist Beam, Header and Column Specifier’s Guide (TJ-9000) for Microllam LVL, and Roseburg’s LVL load charts state that bearing lengths are based on compression perpendicular to grain of the LVL and that the support material must also be checked (Roseburg 1.75 in. 2.1E LVL PLF charts, checked 20 October 2026).
What that means on site:
- The weakest material governs. A softwood wall plate under a heavy beam often needs more length than the LVL itself.
- Every ply bears. On a 3-ply beam, all three plies sit fully on the support. A post narrower than the beam leaves outer plies hanging.
- Lateral support at bearings. Roseburg’s charts also require lateral support at bearing points and continuous lateral support of the top edge.
How are multi-ply LVL beams fastened together?
Multi-ply LVL beams are fastened with rows of nails, bolts or structural screws so all plies share the load. Boise Cascade’s technical note LVL-03 puts it plainly: “When side loaded beams are not connected properly, the inside plies do not support their share of the load and thus the load carrying capacity of the full member decreases significantly” (Boise Cascade technical note LVL-03, Rev 08-26, checked 20 October 2026).
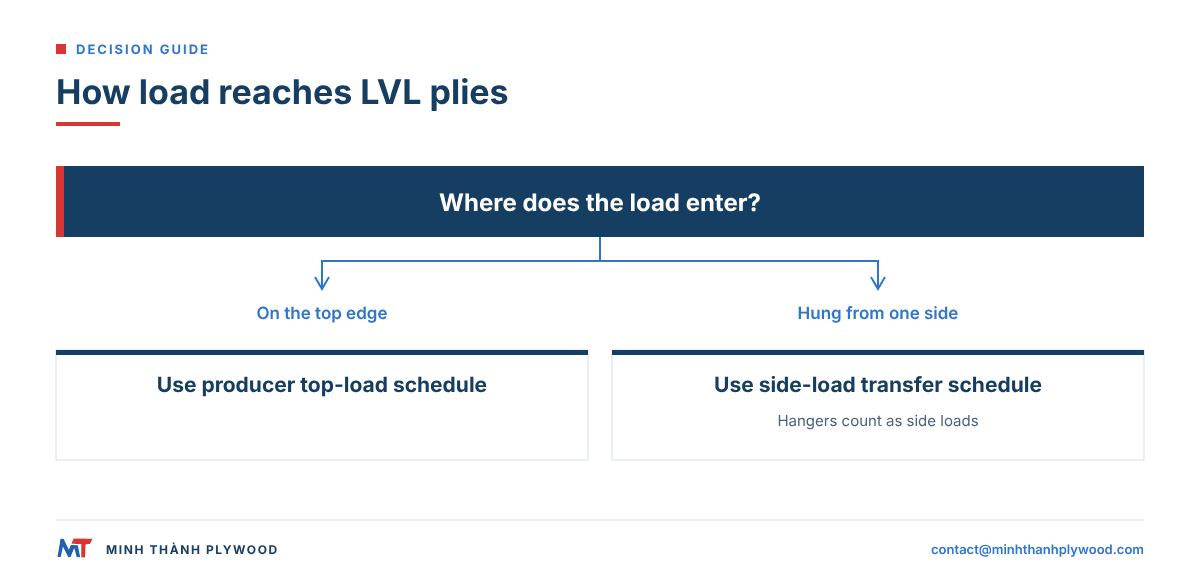
The deciding question is how the load arrives:
- Top-loaded beams carry loads that sit on the top edge, such as a wall or joists bearing on top. Boise’s note LVL-17 says these may be fastened at 24 in. on centre with the listed nails.
- Side-loaded beams carry joists or beams hung from one face. The fasteners must move that load into the plies on the far side, so the schedule is denser and the hanger counts as a side load even when it is a top-flange model.
Lay the plies on a flat surface, align top edges, and fasten from one face for 2-ply beams. For 3-ply members, published details often call for nails driven from both faces so each outer ply grips the centre ply.
What is the LVL beam nailing pattern for 2-, 3- and 4-ply beams?
The LVL beam nailing pattern is printed on the connection detail of your beam report; the published examples below show what a typical schedule looks like for 1¾ in. plies under residential floor loads.
| Beam | Load case in the note | Fastening | Published capacity | Source |
|---|---|---|---|---|
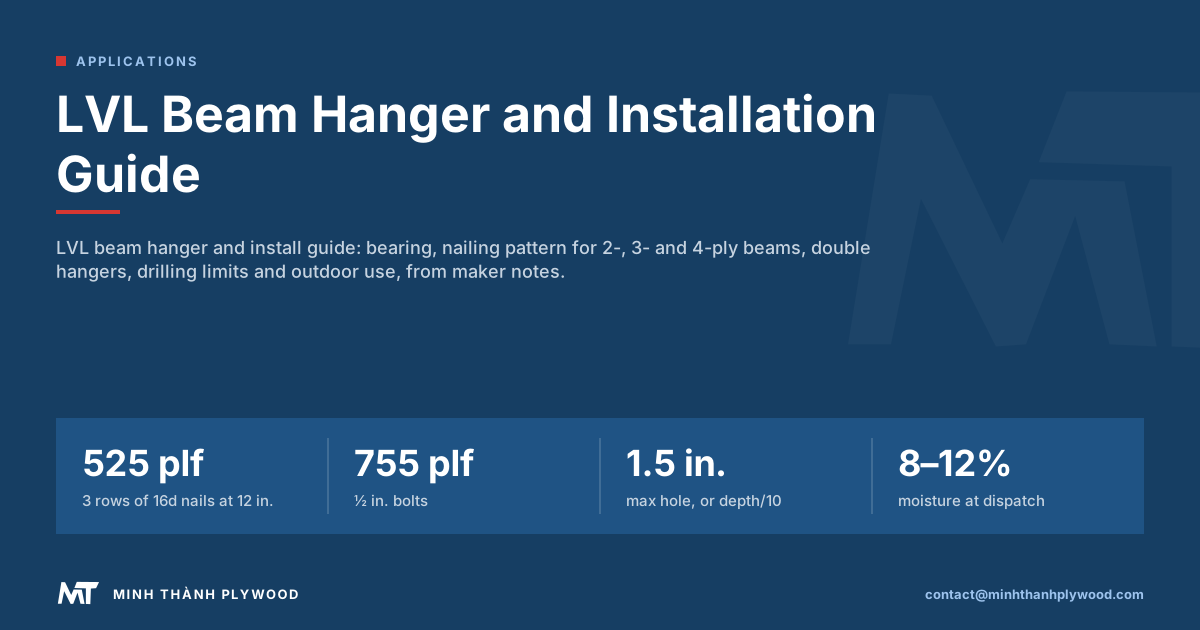
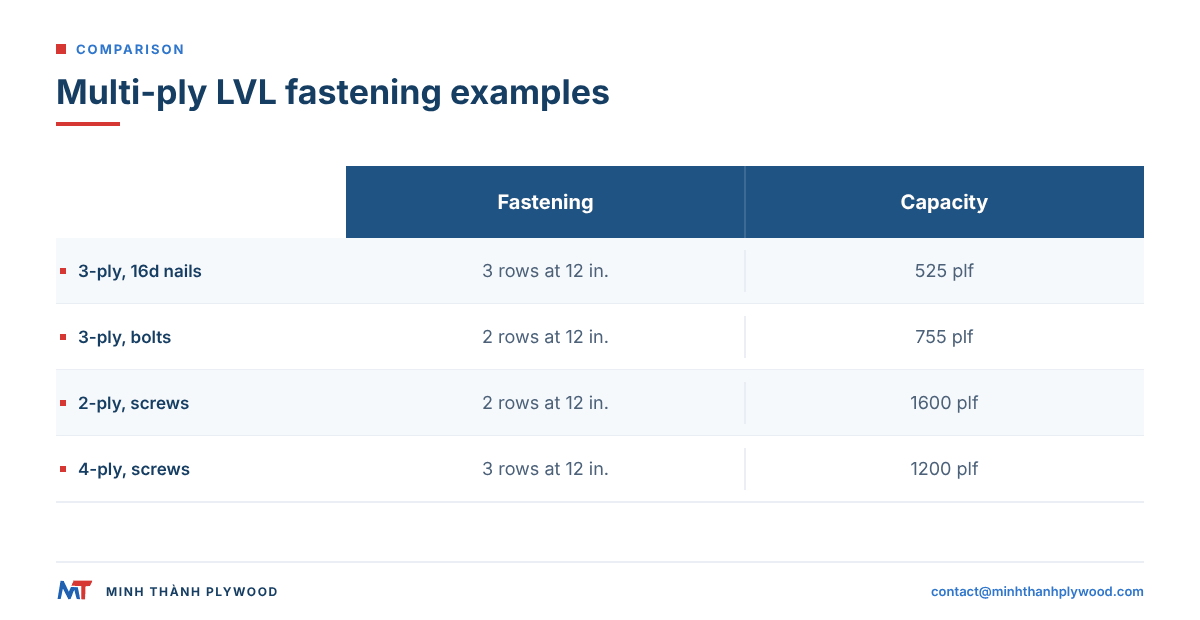
| 3-ply 1¾ × 14 in., 16 ft span | 450 plf side load | 3 rows 16d sinkers at 12 in. o.c. | 525 plf | Boise LVL-03 |
| Same beam | 450 plf side load | ½ in. bolts, 2 rows at 12 in., staggered | 755 plf | Boise LVL-03 |
| 2-ply 1¾ in. | Side load | SDW 3⅜ in. screws, 2 rows at 12 in. o.c. | 1600 plf | Boise LVL-16 |
| 3-ply 1¾ in. | Side load | SDW 5 in. screws, 3 rows at 24 in. o.c. | 675 plf | Boise LVL-16 |
| 4-ply 1¾ in. | Side load | SDW 6¾ in. screws, 3 rows at 12 in. o.c. | 1200 plf | Boise LVL-16 |
| Any 1¾ in. multi-ply | Top load only | Listed nails at 24 in. o.c. | n/a | Boise LVL-17 |
Notes from the same documents:
- Deep beams need a third row. LVL-16 sets a minimum of 3 rows of screws for multi-ply beams deeper than 18 in. (Boise Cascade technical note LVL-16, checked 20 October 2026).
- Nail substitutions are tabulated. Where 16d sinkers at 12 in. o.c. are specified, LVL-17 allows 3 in. × 0.131 in. power-driven nails at 8 in. o.c. or 16d common nails at 14 in. o.c. (Boise Cascade technical note LVL-17, checked 20 October 2026).
- Hanger nails get longer. When hangers sit on the tip side of the screws, LVL-16 calls for hanger face fasteners at least 3 in. long.
Use these as a picture of a typical schedule, not as your schedule. Capacities change with brand, grade, ply width and fastener.
How do double LVL hangers differ from single hangers?
Double LVL hangers are hangers sized for two plies side by side, with a seat as wide as the fastened pair. A 2-ply beam of 1¾ in. plies is 3½ in. wide; it needs a hanger listed for 3½ in. engineered lumber, and the plies must be fastened together before the beam goes into the seat.
Points that catch installers out with double and triple hangers:
- Fasten first, hang second. A loose pair in one hanger behaves as two single beams, each with half a seat.
- Width tolerance matters. Seats for engineered lumber are sized to the actual width. Shimming a lumber hanger to fit LVL is not an approved fix.
- Skewed and sloped models are different parts. A beam meeting a girder at an angle needs the skewed model listed for that angle, not a bent square hanger.
- Concealed-flange models suit beams near the end of a girder where a standard flange would hang off the end.
Can you drill or notch an LVL beam?
Field notches in LVL beams are not allowed without an engineer, and holes are allowed only small and only in low-stress zones. A 2021 Construction Canada guide to field drilling LVL and glulam gives typical limits (Construction Canada, field notching and drilling LVL and glulam, checked 20 October 2026):
| Rule for horizontal holes | Typical limit in the guide |
|---|---|
| Maximum diameter | 1.5 in. or one tenth of the beam depth, whichever is smaller |
| Clear spacing between holes | 8 hole diameters |
| Distance to top or bottom face | 4 hole diameters |
| Distance from beam end | 8 hole diameters |
| Number of holes | 1 per 5 ft of beam length |
| Moment-critical zone | No holes unless an engineer approves |
| Small holes, 1 in. or less | Middle half of the depth, at least 6 in. clear of the support |
Vertical holes through the wide face cut capacity directly and the guide advises avoiding them. Holes are for access, such as pipes and cables, and must never become attachment points for brackets. Heavy suspended loads go on top of the beam, not from holes in the lower half.
Your producer’s own hole chart takes priority over these general figures.
Hanger and post connections: what holds the beam up?
A beam is held up by its end connections, so the connection is designed and installed with the same care as the beam. Three end details cover most LVL work:
- Beam on a post with a post cap. A steel cap ties the beam to the post and stops it sliding or lifting. The cap width matches the full beam width.
- Beam in a pocket of a masonry or concrete wall. The pocket gives full bearing, an air gap at the end and sides, and a damp-proof layer under the beam so the end does not wick moisture.
- Beam hung from a girder. A face-mount or top-flange hanger carries it; the girder then takes the load as a side load and its own plies need the denser schedule.
Concentrated loads, such as a post landing on the beam from the floor above, are the case where a published nailing table may not be enough. Boise’s LVL-17 sends side-loaded point loads beyond its tables back to the professional of record.
Using LVL as a support beam over posts and openings
An LVL support beam over posts or a wide opening works because LVL comes in long, straight lengths with consistent stiffness, so one member can replace a built-up timber beam. The installation points are specific to that use:
- Continuous load path. Each post carries its load down to a footing. A post sitting on a floor sheet without blocking under it is not a support.
- Crown up. LVL is manufactured straight, but any marked top or crown goes up so dead load flattens it.
- No splices mid-span. A beam joined over a post must be shown on the drawings; a butt joint in the span is a hinge.
- Sheathing as bracing. Floor sheathing nailed to the top edge restrains it. Until it is on, brace the beam.
Can an LVL beam be used outdoors?
Standard structural LVL is designed for dry service, so it is not used fully exposed outdoors. Roseburg’s LVL charts, for example, apply to standard term loading and dry service conditions. Outdoors you have three options:
- Use LVL sold for exterior or treated service, with the producer’s adjusted design values.
- Cover the beam fully, with roofing above and cladding or flashing on the sides and ends, so it stays dry in service.
- Choose another material, such as treated sawn timber or glulam made for exterior use, where the beam will be wet.
During construction, LVL tolerates short wetting, but leaving beams in rain for weeks lets the veneers swell and the faces check. Keep wrapped bundles off the ground on bearers and under cover.
For non-structural LVL components, such as packaging runners and frames, a phenolic weather and boil proof (WBP) bond gives the glue line water resistance. The wood still needs a finish and sealed ends outdoors.
How should LVL be stored and handled on site?
LVL is stored flat, dry and supported so it stays straight until it goes in. The checklist installers use:
- Off the ground on level bearers at close spacing, so long beams do not sag.
- Covered with a breathable wrap, open at the base so condensation can escape.
- Lifted on the wide face with slings; forks under the narrow edge can split the bottom veneers.
- Kept in the original wrap until needed, with labels visible so grade and depth stay traceable.
- Not cut in advance. Cutting to length on the ground, after checking the drawing, avoids short beams and wasted bearing.
What are the most common LVL installation mistakes?
The most common LVL installation mistakes are connection mistakes, not beam failures. Inspectors see the same faults repeatedly:
- Empty hanger holes or the wrong nail length in hangers.
- Lumber hangers on LVL, with a gap at the seat.
- Plies not fastened, or fastened to a top-load schedule on a side-loaded beam.
- Notches cut at bearings so the beam fits under a plate, or for a duct.
- Short bearing, where the beam was cut short or the post is narrower than the beam.
- Beams laid flat as planks, which loses most of the stiffness.
- Wet beams closed in, trapping moisture in the building.
Each one is avoidable by checking the work against the beam report before the sheathing goes on.
What should you check when LVL arrives from a mill?
Check identity, dimensions, straightness and glue lines when LVL arrives, before any machining. For imported LVL, the receiving check is the importer’s protection:
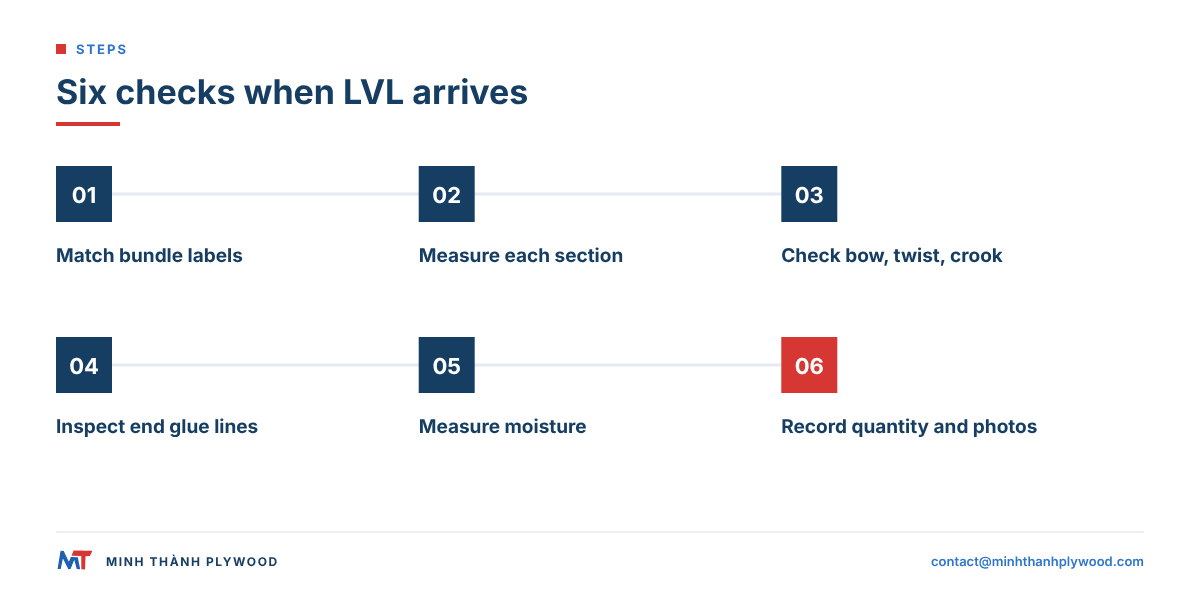
- Match bundle labels to the order: species, grade, section and length.
- Measure the section on several pieces: width, depth and length.
- Sight along the edges for bow, twist and crook.
- Look at the ends for open glue lines or delamination.
- Measure moisture on a few pieces. Our LVL leaves the mill at 8–12%, the normal range for dry service.
- Photograph and record the received quantity with the documents before cutting.
For structural use in Europe, ask which standard the beam was evaluated to. The requirements for structural LVL are in the European standard EN 14374:2004. CE marking of structural LVL falls under the Construction Products Regulation, Regulation (EU) No 305/2011. The new Construction Products Regulation, Regulation (EU) 2024/3110, entered into force on 7 January 2025 and applies from 8 January 2026.
How Minh Thanh Plywood supplies LVL
Minh Thanh Plywood makes LVL from locally grown Acacia or Eucalyptus plantation veneers in Ha Hoa, Phu Tho, with the grain running along the member. Our LVL serves furniture frames, door components, industrial packaging and engineered members specified by the project.
| Specification | Minh Thanh LVL |
|---|---|
| Veneer species | Acacia or Eucalyptus plantation timber |
| Billet formats | 1220 × 2440 or 1250 × 2500 mm |
| Density | Acacia about 580 kg/m³; Eucalyptus 650–750 kg/m³ |
| Moisture at dispatch | 8–12% |
| Interior bond and emission | UF glue at E0 emission; E1 option |
| Water-resistant bond | MR / melamine-fortified or phenolic WBP |
| Order | 1×40HC, production 15–45 days after deposit |
For structural use, the engineer sizes the beam from the evaluated grade’s published design values, and the installer follows that producer’s hanger and fastening literature. We cut members to your section and length schedule from the billet and pack them in labelled bundles. Every shipment is photographed and filmed before loading, and buyers get the photos and video. Read more on the LVL product page or compare LVL with plywood for components.
What should you send for an LVL quote?
Send the application, the member schedule and the bond, and we price the material, cutting and packing together. A complete LVL request lists:
- Application: furniture frame, door component, packaging runner or engineered member.
- Section and length: finished thickness, width and length per piece, with quantities.
- Species and grade: Acacia or Eucalyptus, visible faces if any.
- Bond and emission: UF at E0, MR or phenolic WBP.
- Design data: any design values or evaluation the project requires.
- Packing and destination: bundle size, labels, port and Incoterm.
Email contact@minhthanhplywood.com or WhatsApp Lisa on +84 988 586 601; we reply within hours, and free samples are available.
Buyer questions, answered
What size hanger do I need for an LVL beam?
Choose the hanger model listed for the exact beam width and depth, and for the number of plies. A 3-ply beam of 1¾ in. plies is 5¼ in. wide; select a hanger listed for that finished beam width, depth and load.
Can you use joist hangers on LVL?
Yes. Face-mount and top-flange hangers are used on LVL every day. Use the model and fasteners the hanger maker lists for engineered lumber, and fill every specified nail hole.
How do you nail two LVL beams together?
Follow the connection detail on the beam report. A common published schedule for side-loaded beams is 3 rows of 16d sinkers at 12 in. on centre, with nails driven from both faces on 3-ply members.
Can you screw LVL beams together instead of nailing?
Yes. Boise Cascade technical note LVL-16 lists Simpson Strong-Tie SDW screws for 2-, 3- and 4-ply beams, with at least 3 rows on beams deeper than 18 in.
Can an LVL beam be notched?
No field notches at the bearing or in the span unless an engineer designs them. Small horizontal holes are allowed only in the zones the producer shows.
How much bearing does an LVL beam need?
The bearing length comes from the producer's specifier guide for the load and the support material. Check both the LVL and the post or wall plate under it.
Can LVL beams be used outdoors?
Standard structural LVL is rated for dry service. Outdoors, use LVL sold for exterior or treated use, or keep the beam fully covered and protected.
Do I need an engineer to install an LVL beam?
An LVL beam is sized and detailed from the producer's tables, software report or an engineer. The installer follows that report; any change to size, hanger, holes or bearing goes back to the designer.
Which way up does an LVL beam go?
Install it with the wide face vertical, as a beam on edge, and with any printed 'top' or crown mark upward. Load it on its narrow edge, never flat like a plank.
Does Minh Thanh Plywood supply LVL?
Yes. We supply LVL from Acacia or Eucalyptus plantation veneers for furniture frames, door components, packaging and engineered members specified by the project, in 1220 × 2440 or 1250 × 2500 mm billets.