
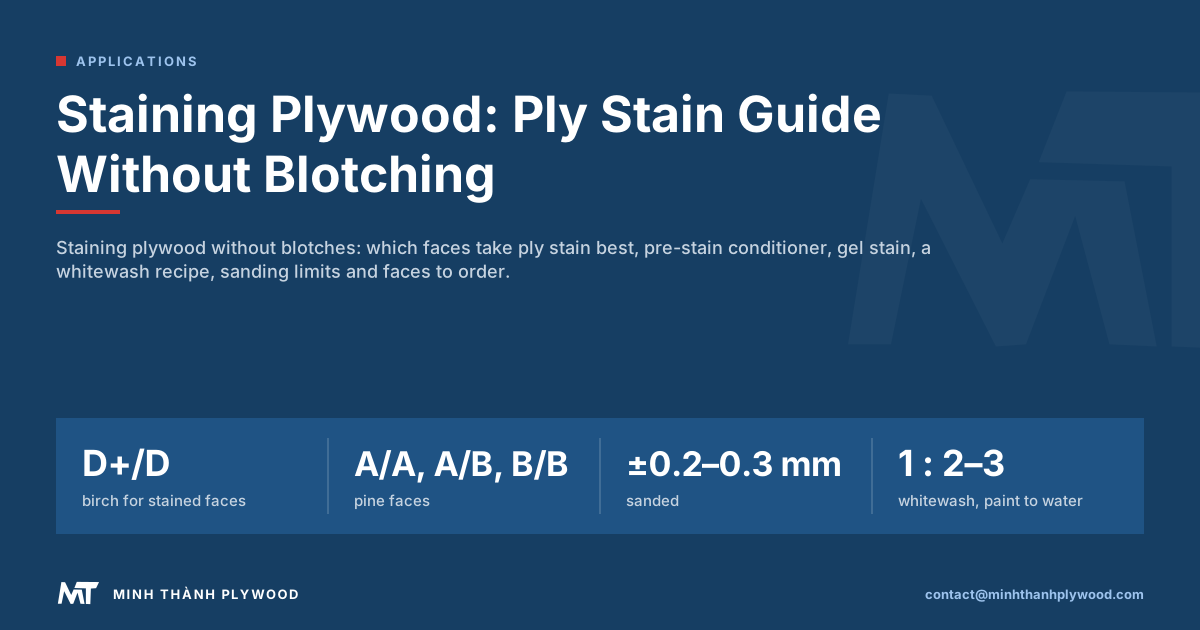
You can stain plywood, but most faces blotch unless you control how fast they absorb. Sand lightly, apply a pre-stain conditioner or thin wash coat, use a gel stain on birch, poplar and pine, and test on an offcut of the same face. Minh Thanh Plywood makes sanded furniture plywood in Vietnam; this guide shows how each face takes ply stain and what to order.
Can you stain plywood?
Yes: staining plywood works because every face is a real wood veneer. The difference from solid wood is control: thin faces, rotary-cut grain and repairs absorb stain unevenly, so plywood needs a conditioner, the right stain type and a test panel.
- Easy faces: plain, even veneers such as poplar and okoume, with conditioner.
- Faces that need care: birch and pine, which blotch with thin penetrating stains.
- Faces you can order in colour: engineered veneer (EV), made in a chosen colour and pattern, often needs no stain at all.
- Faces that do not take stain: film-faced and melamine-faced panels.
Stained plywood is common in furniture, shop fittings and wall panels. The result depends more on preparation and stain type than on skill with a brush.
Plywood that stains well in the US market
Stainable plywood on US shelves is mostly birch, red oak and sande (a pale tropical hardwood) panels, sold as 4 × 8 ft sheets. Home Depot’s stainable-plywood category lists 1/4, 1/2 and 3/4 in nominal thicknesses; the real sizes are thinner, for example 5.2 mm, 12 mm and 18 mm. Sizes in feet convert at exactly 25.4 mm to the inch. In round metric, 4 × 8 ft is 1220 × 2440 mm, the size we make. Stainable hardwood plywood sold in the US must also meet the formaldehyde limit of 0.05 ppm for veneer-core hardwood plywood under 40 CFR 770.10.
| US nominal thickness | Typical actual thickness | Common stainable faces |
|---|---|---|
| 1/4 in | 5.2 mm | Birch, sande |
| 1/2 in | 12 mm | Birch, sande |
| 3/4 in | 18 mm | Birch, red oak, sande |
Our range runs 3–40 mm in 1220 × 2440 mm and 1250 × 2500 mm sheets, so it covers each of these thicknesses. Order the face for the stain you plan: birch and poplar for an even, pale ground, pine for a rustic look.
Staining plywood in 9 steps
Stain plywood in this order: sand, clean, condition, stain, wipe, dry, seal. These steps suit oil-based and water-based wiping stains and gel stains.
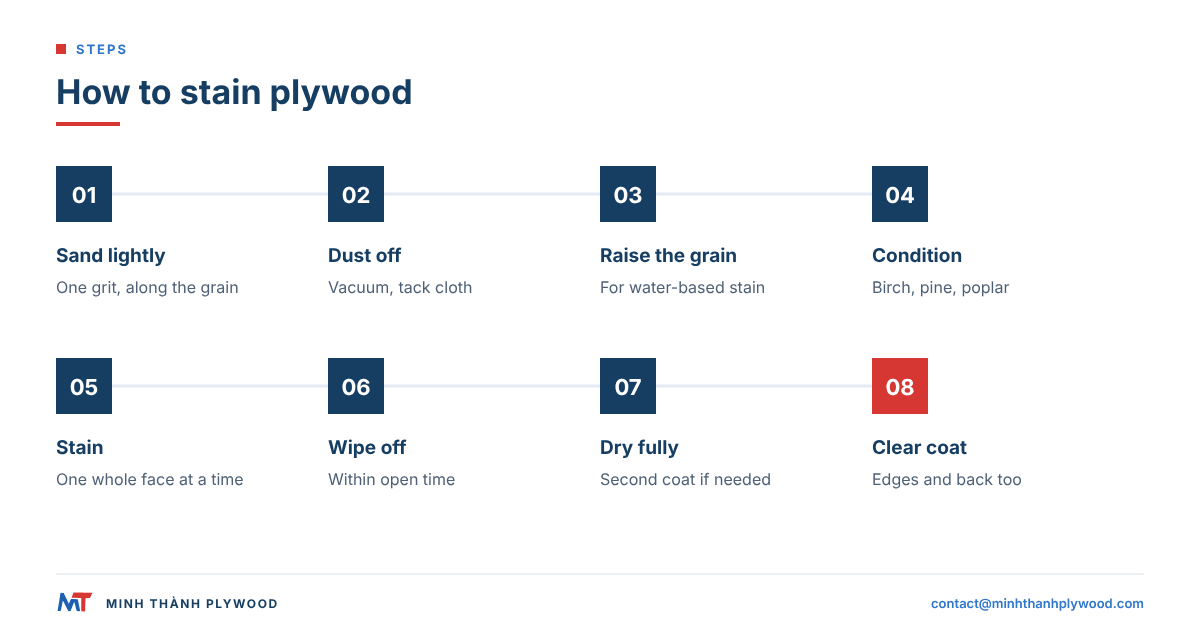
- Sand lightly along the grain. A factory-sanded face needs only 180 to 220 grit; start at 80 to 100 grit only to remove a mark, and finish the whole panel at the same grit.
- Remove all dust with a vacuum and a tack cloth.
- Wipe the face with a damp cloth, let it dry and sand off the raised grain if you will use a water-based stain.
- Apply pre-stain conditioner or a thin wash coat on birch, pine and poplar, and leave it about 15 minutes before staining.
- Apply the stain with a cloth, brush or pad, working one whole face at a time.
- Wipe off the excess along the grain after 5 to 15 minutes, or within the label’s open time.
- Let it dry fully, 4 to 24 hours before sealing depending on the stain and the weather; add a second coat only if the colour is too light.
- Seal with a clear coat, edges and back included.
- Sand lightly between clear coats with 220 grit, without cutting through to the colour. Two or three clear coats is the usual count, each dry for 4 to 6 hours.
Stain the edges with the faces. End grain absorbs much more, so edges come out darker unless you condition them twice or band them first.
Why does plywood stain blotchy?
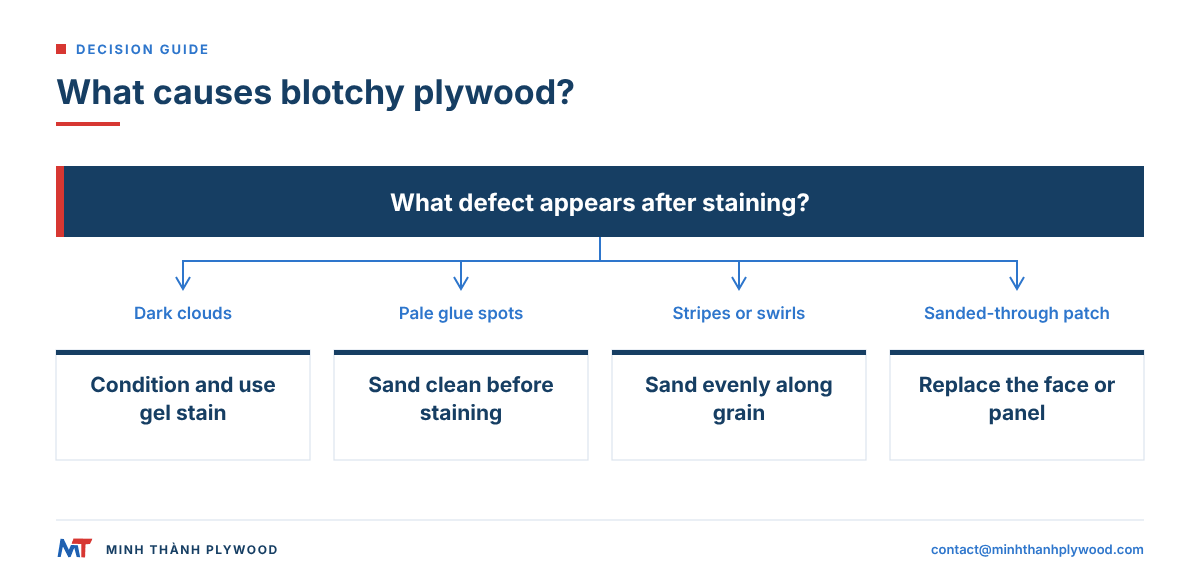
Plywood blotches because parts of the face absorb stain faster than others. Dense and open zones, curly figure, patches, glue spots and sanding marks all take stain at different rates, and a thin penetrating stain shows every difference.
| Cause | What you see | Fix |
|---|---|---|
| Rotary-cut grain with dense and soft zones | Large dark clouds | Conditioner, gel stain |
| Curly or figured areas | Dark swirls | Wash coat, dye instead of pigment stain |
| Patches and repairs | Lighter or darker shapes | Choose a higher face grade |
| Glue squeeze-out or fingerprints | Pale spots that reject stain | Sand clean before staining |
| Uneven sanding | Stripes and swirl marks | Finish at one grit, sand along the grain |
| Sanded-through face | Different-coloured patch | Cannot be stained over; replace |
Birch, pine, poplar and maple-type faces blotch most. Our guide on how to finish birch plywood goes deeper into birch.
Which plywood faces take stain best
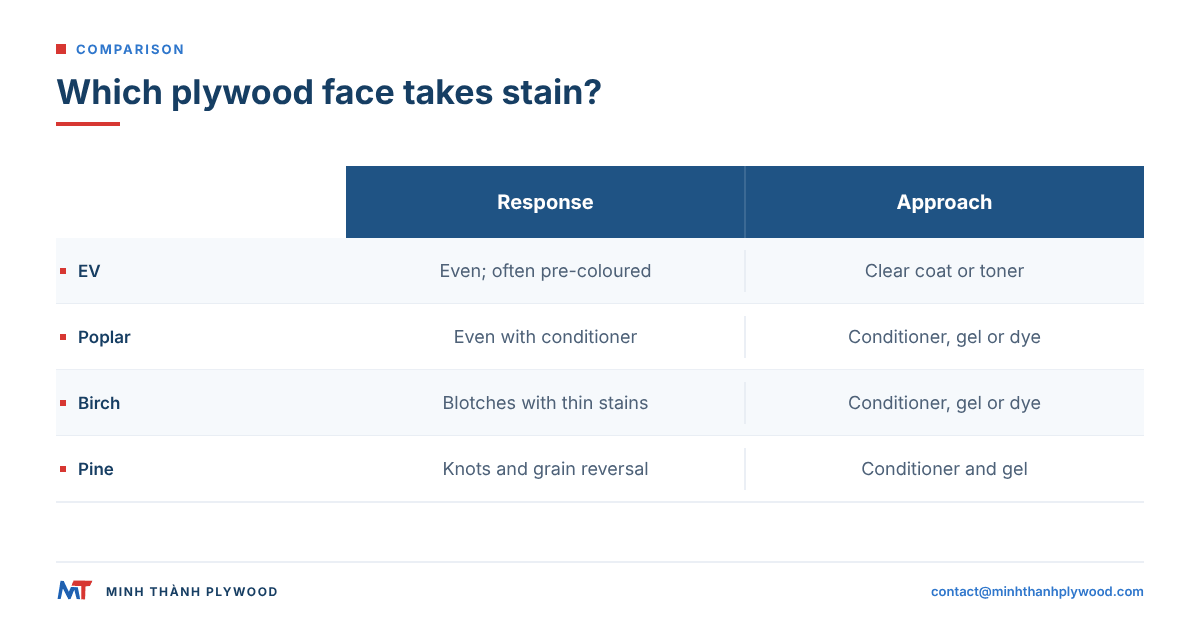
Plain, evenly dense faces take stain best, and faces with strong contrast between earlywood and latewood take it worst. The table ranks the faces we make.
| Face | Stain response | Best method | Grade for a stained finish |
|---|---|---|---|
| Engineered veneer (EV) | Even; often ordered in the final colour | Clear coat or light toner | Standard EV face |
| Poplar | Even with conditioner; can look flat | Conditioner, gel or dye | A/A or A/B |
| Okoume | Pinkish base, takes warm colours well | Conditioner, wiping stain | By approved sample |
| Eucalyptus | Fine texture, reddish base | Wiping stain, test colour first | A/A or A/B |
| Birch | Blotches with thin stains | Conditioner, gel stain or sprayed dye | D+/D |
| Pine | Strong grain reversal, knots | Conditioner, gel stain | A/A or A/B |
Stain makes colour differences inside a face stronger, so a stained finish needs a better face than paint does. Our veneer grading page shows how faces are sorted against the approved sample.
How to stain birch plywood
Stain birch plywood with a conditioner or thin wash coat first, then a gel stain or a dye, and seal it with a clear coat. Thin oil-based wiping stains on bare birch almost always blotch, because the dense, fine grain takes colour unevenly.
- Sand with fine abrasive and stop at one grit; do not polish the face with very fine paper, which makes it reject stain.
- Condition: a commercial pre-stain conditioner, or a wash coat of shellac or water-based clear thinned well down.
- Stain: gel stain wiped on and off, or a water-based dye, sprayed or wiped.
- Even out: a toner (tinted clear coat) sprayed over the stain evens out remaining clouds.
- Seal: water-based polyurethane keeps the colour; oil-based adds amber.
Birch D+/D faces, about B/BB on the European scale, are the usual choice when birch will be stained. Our birch plywood page explains the D+, D and E ladder.
Stain pine plywood: knots, resin and grain reversal
To stain pine plywood evenly, control the soft earlywood, which drinks stain and goes dark, while the hard latewood stays light. A conditioner and a gel stain bring the two closer.
- Grain reversal: thin stains turn pine’s light and dark bands the other way round; gel stain reduces it.
- Knots: take stain darker and can bleed resin; spot-seal them with shellac.
- Colour choice: warm mid-tones hide pine’s contrast better than greys or very dark colours.
- Clear coat: oil-based finishes add a honey tone many buyers want on pine.
Pine-faced panels are quoted as face/back grade pairs A/A, A/B and B/B, matched to the buyer’s approved sample. See our pine plywood page for the grades.
Pre-stain wood conditioner and wash coats
A pre-stain wood conditioner partly seals the surface, so the dense and soft parts of the face absorb stain at closer rates. It costs some colour depth but removes most blotching.
- Commercial conditioner: match it to the stain base, oil or water; stain within the label’s time window.
- Wash coat: shellac or water-based clear thinned well down; a little stronger than conditioner.
- Glue size: very thin hide glue or PVA solution; an old cabinetmaker’s method for end grain.
- Test the strength: too strong a seal leaves the stain pale; too weak still blotches.
Trial the conditioner within the finish supplier’s own system, on an offcut of the same face. Keep the trial panel as the colour reference for the order.
Plywood stain types compared
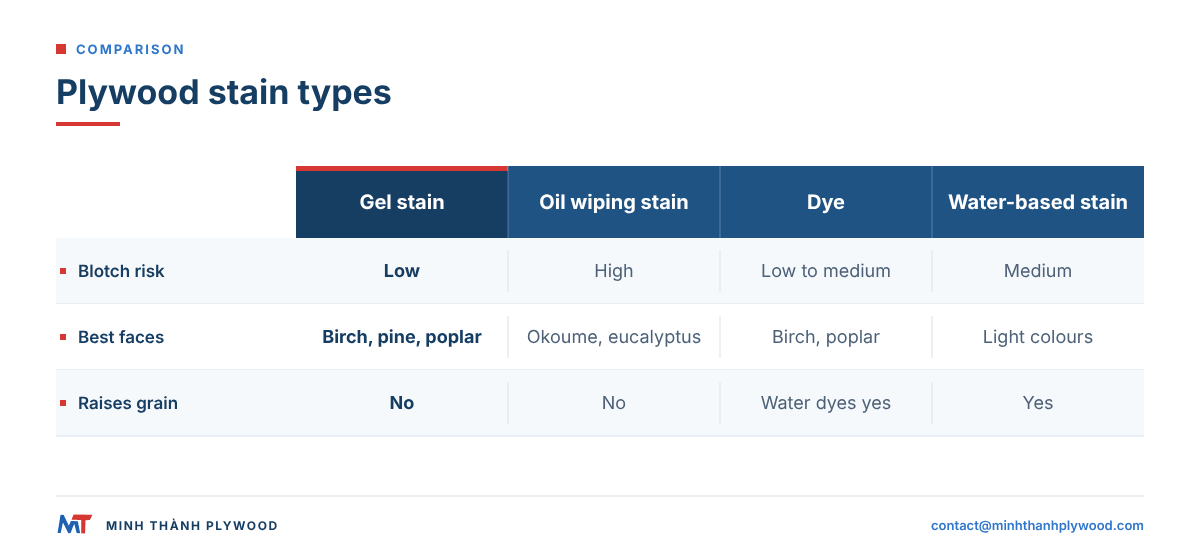
The plywood stain you choose decides how much blotching you get. Gel stains sit on the surface and are the most forgiving; thin penetrating stains show every change in density.
| Stain type | How it colours | Blotch risk on plywood | Best for |
|---|---|---|---|
| Gel stain | Pigment in thick gel, sits on top | Low | Birch, pine, poplar, vertical surfaces |
| Oil-based wiping stain | Pigment and dye, soaks in | High without conditioner | Okoume, eucalyptus, small parts |
| Water-based stain | Pigment in water, soaks in, raises grain | Medium | Light colours, fast work |
| Dye (water or alcohol) | Dissolved colour, no pigment | Low to medium when sprayed | Clear, even colour on tight faces |
| Glaze | Pigment between clear coats | Low | Antique effects, colour correction |
| Toner | Dye or pigment in a clear coat | Low | Production lines, evening colour |
Wood stain on plywood gives colour, not protection. Every stain needs a clear coat on top; our comparison of varnish and clear finishes for plywood helps you choose it.
Sanding limits before staining
Sand plywood before staining only enough to remove handling marks, and finish the whole panel at one grit. The face veneer is thin, and a sanded-through patch shows the layer below in a different colour.
- Factory-sanded faces need a scuff: our faces are sanded and polished, and sanded furniture panels are held to ±0.2–0.3 mm thickness tolerance, so they need no levelling.
- Grit numbers: the face veneer is often thinner than 1/40 in (about 0.6 mm), so most professionals stop at 180 to 220 grit. Use 80 to 100 grit only to remove a mark, never to level the panel.
- Stop at fine grit: polishing with very fine paper burnishes the surface and the stain takes lighter.
- Sand by hand at the edges: power sanders cut through faster at arrises.
- Check in raking light for swirl marks before staining; stain shows every one.
Our guide on how to sand plywood covers grit sequences and sanding without breaking through the face veneer.
How to whitewash plywood
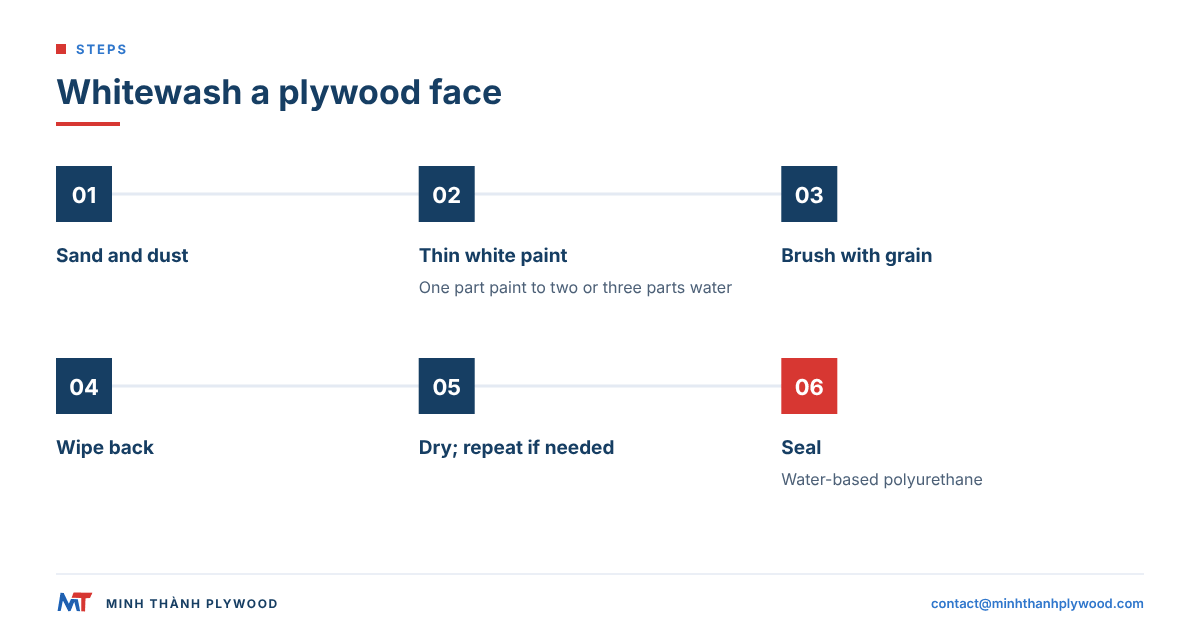
Whitewash plywood with thinned white paint wiped into the grain, then seal it with a non-yellowing clear coat. Whitewashed plywood keeps the grain visible under a soft white tone.
- Sand and dust the face as for staining.
- Mix white water-based paint with water, about one part paint to two or three parts water.
- Brush on along the grain, one face at a time.
- Wipe back with a lint-free cloth after a few minutes; wipe more for more grain.
- Dry, then add a second coat if you want it whiter.
- Seal with water-based polyurethane, matt or satin.
Pale faces such as poplar and birch give the cleanest whitewash. On pine, a stain-blocking first coat stops knots showing yellow through the white.
Matching colour across joints, patches and panels
Match stained colour across a project by staining all parts from one mixed batch, on faces of the same species and grade, at the same time. Two panels of the same species can still take stain differently.
- Mix enough stain for the whole job in one container.
- Stain parts side by side and compare them under the light they will live in.
- Use a toner to bring a lighter part closer to the others.
- Order faces from one production run for large projects, against one approved sample.
- Check repairs: patches in the face take stain differently; the face grade sets how many there are.
Transparent colour shows joints between face veneer leaves too. Book-matched or slip-matched faces look more even under stain than random-matched ones.
When not to stain plywood
Do not stain plywood when the colour must match across many panels, when the faces are mixed grades with repairs and patches, or when you want a dark, uniform colour from a pale, blotch-prone face. Paint, a pigmented opaque finish or a factory-coloured face does these jobs better.
If you do stain, buy all the sheets for one project together and plan an extra sheet for matching. Cut parts from adjacent areas of the same sheet and test the stain on offcuts from each sheet before you start. Stain takes differently on each veneer, so the colour of two sheets rarely matches.
Stained plywood topcoats
Seal stained plywood with a clear coat that suits the use: water-based polyurethane for most furniture, oil-based for warmth and wear, spar varnish outdoors. Let the stain dry fully first.
- Water-based clear over oil-based stain: wait longer, or use a barrier coat, as the stain label advises.
- First clear coat gently: brush or spray without scrubbing, or the colour lifts.
- Two or three clear coats, sanding lightly between them without cutting into the colour.
The US Forest Products Laboratory’s Wood Handbook (FPL-GTR-282, 2021) treats stain and clear coat as one finishing system: the stain colours, the film over it protects.
- Seal edges and back too, so the panel stays flat.
How to remove water stains from plywood
A white ring in a finish is moisture trapped in the film and often lifts with gentle heat or a fine polish. A dark stain in bare or unfinished plywood is in the wood itself and needs oxalic acid wood bleach.
- White marks in a finish: warm the area gently with a hairdryer, or rub with a fine polishing compound.
- Dark marks in unfinished plywood: apply oxalic acid wood bleach to the label, let it work, then neutralise and rinse.
- Let it dry fully, sand lightly with fine abrasive and refinish the area.
- Check the panel: if the face has lifted or the plies have separated, the panel needs replacing, not bleaching.
Water marks on plywood are a sign of long wetting. Our guide on whether plywood is waterproof explains what each glue line survives.
Checks on a stained sample
Approve stained plywood on a full-size sample under the final light, not on a small chip. Five checks catch most problems.
- Blotching: no dark clouds or stripes at arm’s length.
- Edges: edge colour close to the face, or covered by banding.
- Repairs: patches acceptable for the grade ordered.
- Colour match: within the agreed range of the reference sample.
- Clear coat: even sheen, no lifted colour, no runs.
Our quality control checks raw faces against the approved sample before loading, and every shipment is photographed and filmed.
What this means for your order
For stained furniture, order a face that takes stain evenly in a grade high enough to show, and test your stain system on a free sample. Send these lines with your request:
- Application: stained furniture, cabinets, wall panels or shop fittings.
- Face and grade: birch D+/D, poplar A/B, pine A/B, okoume or eucalyptus A/B by approved sample, or EV in the target colour.
- Surface: sanded and polished, both faces UV-ready for factory finishing.
- Core and glue: white Styrax or Eucalyptus core; UF glue at E0 emission for interiors.
- Size and thickness: 1220 × 2440 mm or 1250 × 2500 mm, 3–40 mm.
- Quantity: from one 40HC, mixed specifications by agreement.
See our furniture plywood from Vietnam range, and the pillar guide on how to finish plywood for paint, stain and clear finishes together.
Buyer questions, answered
Can you stain plywood?
Yes. Plywood faces are real wood veneer and take stain like solid wood. The main risk is blotching on birch, pine and poplar, which a pre-stain conditioner or a gel stain controls.
Can you stain birch plywood?
Yes, but birch blotches with thin penetrating stains. Seal it first with a conditioner or a thin wash coat, then use a gel stain or a dye, and test on an offcut of the same panel.
Why does plywood stain blotchy?
Blotching comes from uneven absorption: areas of curly or dense grain, repairs and glue spots take stain at different rates. Thin face veneers, rotary-cut grain and coarse sanding make it worse.
What is the best stain for plywood?
Gel stain is the most forgiving on plywood because it sits on the surface and does not soak in unevenly. Water-based dyes give clear, even colour on tight faces such as birch and poplar when sprayed.
Do you need to sand plywood before staining?
Yes, lightly. Sand a factory-sanded face with fine abrasive along the grain to remove handling marks, and stop at the same grit across the whole panel so the stain takes evenly.
How do you whitewash plywood?
Mix white water-based paint with water, about one part paint to two or three parts water, brush it on along the grain and wipe it back with a cloth. Seal it with a water-based clear coat that does not yellow.
Should I use pre-stain conditioner on plywood?
On birch, pine, poplar and maple-type faces, yes. Conditioner partly seals the surface so dense and open areas absorb more evenly. Apply the stain within the time the label gives.
How do you remove water stains from plywood?
Light white marks in a finish often lift with gentle heat or a fine polish. Dark stains inside bare wood need oxalic acid wood bleach, used to the label, then a light sand and refinish.
Does stain protect plywood?
Very little. Stain adds colour; the protection comes from the clear coat over it, such as water-based polyurethane indoors or spar varnish outdoors.
Which plywood takes stain best?
Faces with even density and straight grain take stain best: plain poplar and okoume with conditioner, and engineered veneer, which can be ordered in the colour you want. Pine and birch need the most control.