
The best plywood finishes depend on the use: water-based polyurethane or lacquer for furniture and cabinets, hard-wax oil for a natural look, paint for poplar and utility faces, and exterior paint or film for outdoor panels. Each needs the same prep: a dry, sanded, dust-free face and sealed edges. Minh Thanh Plywood compares eight finishes and sets out the steps.
Plywood finishes compared: the decision table
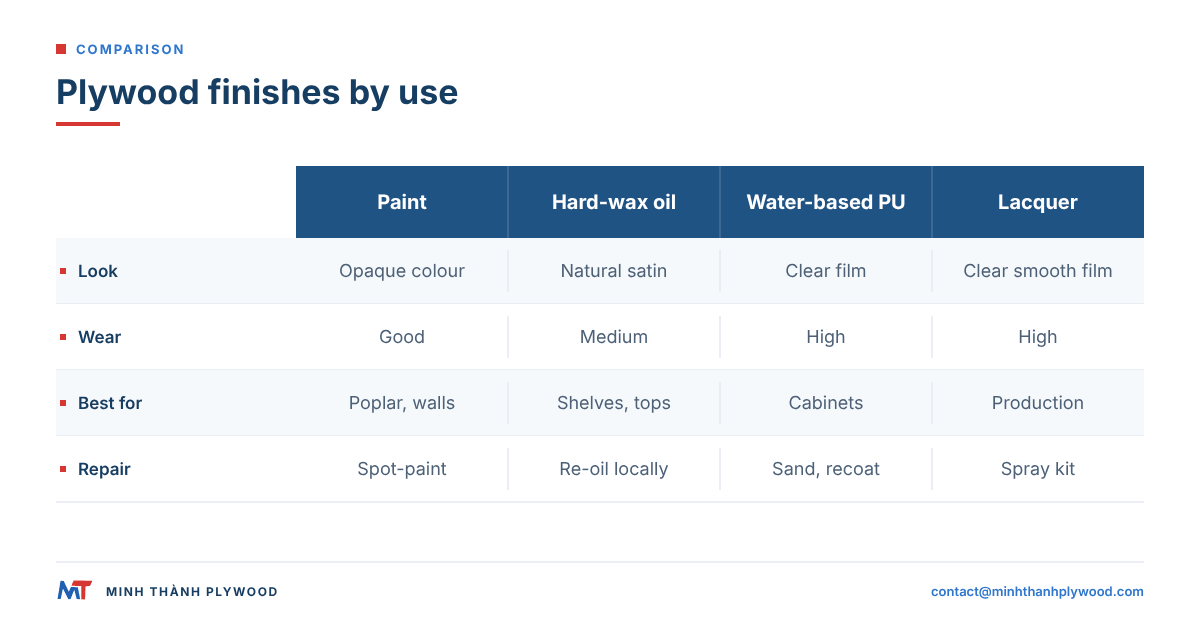
Eight plywood finishes cover almost every job: paint, stain, penetrating oil, hard-wax oil, water-based and oil-based polyurethane, lacquer and a factory UV coating. They differ in look, wear resistance, water resistance and the labour to apply and repair them, so match the finish to the use before you buy.
| Finish | Best use | Look | Wear resistance | Labour | Repair |
|---|---|---|---|---|---|
| Paint (primer + topcoat) | Poplar faces, utility parts, walls | Opaque colour | Good with enamel | Medium | Easy, spot-paint |
| Stain + clear coat | Changing the colour of a clear face | Wood grain, new tone | That of the clear coat | High | Hard to blend |
| Penetrating oil | Decorative panels, low wear | Natural, matt | Low | Low | Easy, re-oil |
| Hard-wax oil | Furniture, shelves, tabletops | Natural, satin | Medium | Low to medium | Easy, local |
| Water-based polyurethane | Cabinets, furniture, kids’ rooms | Clear, little yellowing | High | Medium | Sand and recoat |
| Oil-based polyurethane | Floors, worktops, heavy wear | Warm amber tone | Very high | Medium, slow drying | Sand and recoat |
| Lacquer (spray) | Production furniture, doors | Clear, smooth film | High | Low per part on a spray line | Needs spray kit |
| UV-cured coating | Factory lines, flat panels | Clear, very even | Very high | Factory only | Hard on site |
Choose by the part, not by habit. A kitchen cabinet side, a children’s bed and a shop wall each need a different balance of wear, look and time. The sections below explain each finish and the steps to apply it.
Named products show what each type looks like on the shelf, with the maker’s recoat time on a bare, sanded face at normal room temperature:
| Finish type | Example product | Recoat time (maker’s figure) | Full cure |
|---|---|---|---|
| Hard-wax oil | Osmo Polyx-Oil Original, clear | 8 to 10 hours | 10 to 14 days |
| Water-based polyurethane | Minwax Polycrylic Protective Finish | 2 hours | Per the tin |
| Oil-based polyurethane | Minwax Fast-Drying Polyurethane | 3 to 4 hours | Per the tin |
| Food-safe oil-based finish | General Finishes Wood Bowl Finish (food safe when dry) | 6 to 12 hours | 30 days |
Check the tin for your own room: cold and damp air slows every figure above.
Finish-grade plywood: which sheet to buy for a clear finish
Finish-grade plywood is a panel whose face is good enough to show under a clear coat, and “plywood finishes” often means exactly that search: which sheet to buy so the finish looks right. Buy the face for the finish. A clear coat shows every patch, so the face grade matters more than the coating brand.
| What US shops sell | Face and back | Typical size | Closest Minh Thanh panel |
|---|---|---|---|
| Natural birch, “A-4” or “G1S” | A face, grade 4 back (good one side) | 4 x 8 ft (1220 × 2440 mm) | Birch D/E faces, one side visible |
| Birch, A-1 or A-2 | A face, grade 1 or 2 back | 4 x 8 ft | Birch D+/D faces, both sides visible |
| Maple A-4 and cherry A-1 | Hardwood veneer face | 4 x 8 ft | Veneered plywood to the approved sample |
| Baltic birch, clear face | B/BB, all-birch plies | 5 x 5 ft (1,525 × 1,525 mm) | Birch D+/D, or 1250 × 2500 mm sheets |
| White oak, walnut | Sliced veneer faces | 4 x 8 ft | Engineered veneer (EV) for a uniform colour |
Sheet sizes by market: North America sells 4 x 8 ft (1220 × 2440 mm) and 5 x 5 ft Baltic birch; the UK, Australia and Europe use 1220 × 2440 mm, with 1220 × 3050 mm, 1220 × 3660 mm and 1525 × 3050 mm as larger options. Minh Thanh makes 1220 × 2440 mm and 1250 × 2500 mm as standard, and 1220 × 2500 mm and 1220 × 2280 mm on order.
Within that, Vietnamese birch D+/D sits near B/BB, as the next section sets out, and EV is the answer when a run of doors must match from sheet to sheet. The common trap is ordering a utility G or “11” grade for a clear finish: knots and open defects show through any varnish.
How to finish plywood: preparation in six steps
Every finish on plywood needs the same preparation: a panel at the right moisture, a sanded and clean face, filled defects and sealed edges. Most failures of a finish start before the first coat.
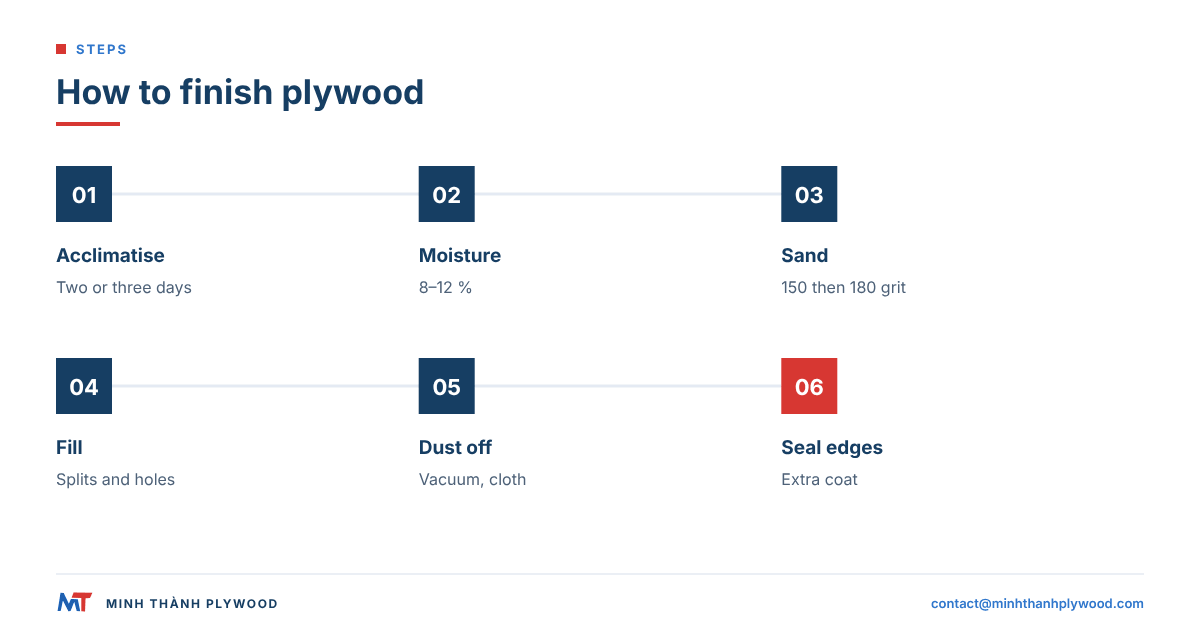
- Acclimatise the panels in the room where they will be used for two or three days, flat and stickered.
- Check the moisture. Furniture plywood leaves the factory dried to 8–12 %; finish only when the panels read within that range again.
- Sand the face with the grain at 150 then 180 grit; birch and fine faces can go to 220.
- Fill small splits, nail holes and open joints with a filler that suits the finish: stainable for clear coats, any for paint.
- Remove all dust with a vacuum and a tack cloth or a damp microfibre cloth for water-based finishes.
- Seal the edges with a first coat of the finish or with banding before the faces are coated.
Minh Thanh faces are sanded and polished at the factory, and both faces are UV-ready, to the standard customers need to apply their own UV coating. On site, a light sanding is all that is needed to open the surface for the first coat.
Face grade and finish: what to order for each look
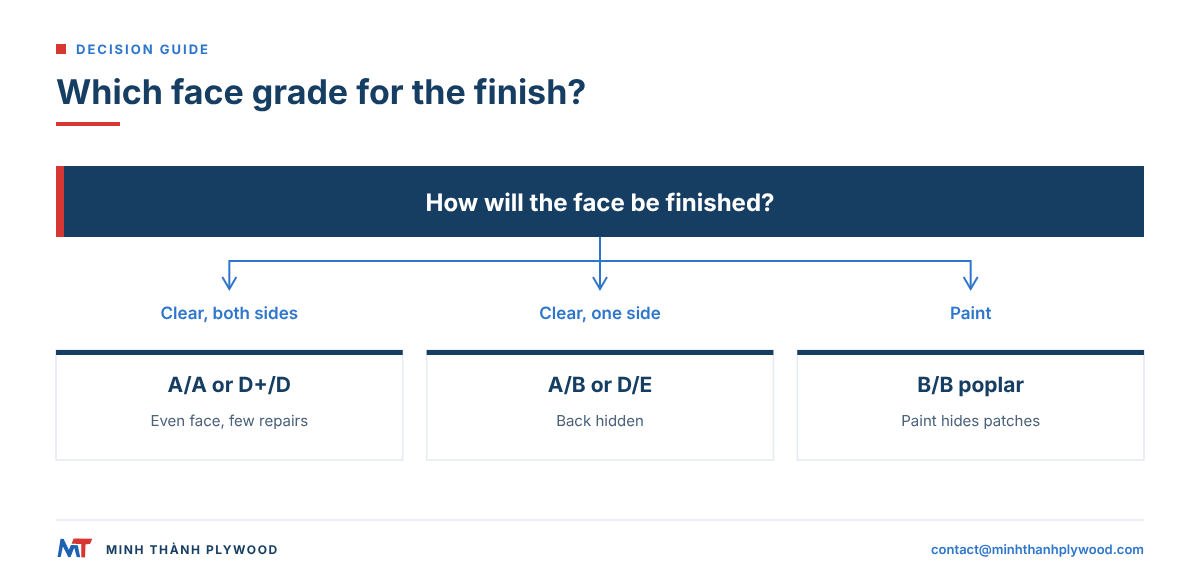
The face grade decides which finish will look right: clear finishes need an even face with few repairs, paint hides patches and colour changes, and stain shows every defect more. Order the grade for the finish, not the other way round.
| Finish planned | Face to order | Grade pair to ask for |
|---|---|---|
| Clear, both faces visible | Birch, pine, eucalyptus or EV | Birch D+/D; pine or eucalyptus A/A |
| Clear, one face visible | Birch, pine, eucalyptus or EV | Birch D/E; pine or eucalyptus A/B |
| Stain | Even-coloured face with little figure change | A/A or A/B to the approved sample |
| Paint | Poplar or eucalyptus | B/B, sanded |
| Laminate or veneer overlay | Any sound face | B/B or utility back |
Birch faces are named D+, D and E in Vietnam; as a buying comparison D+ is close to B and D close to BB, so D+/D sits near B/BB. Pine and eucalyptus faces are quoted as A/A, A/B and B/B, matched to the approved sample. Engineered veneer (EV) gives a uniform colour sheet to sheet, which suits a run of clear-finished doors.
Painting plywood: primer, paint and smooth results
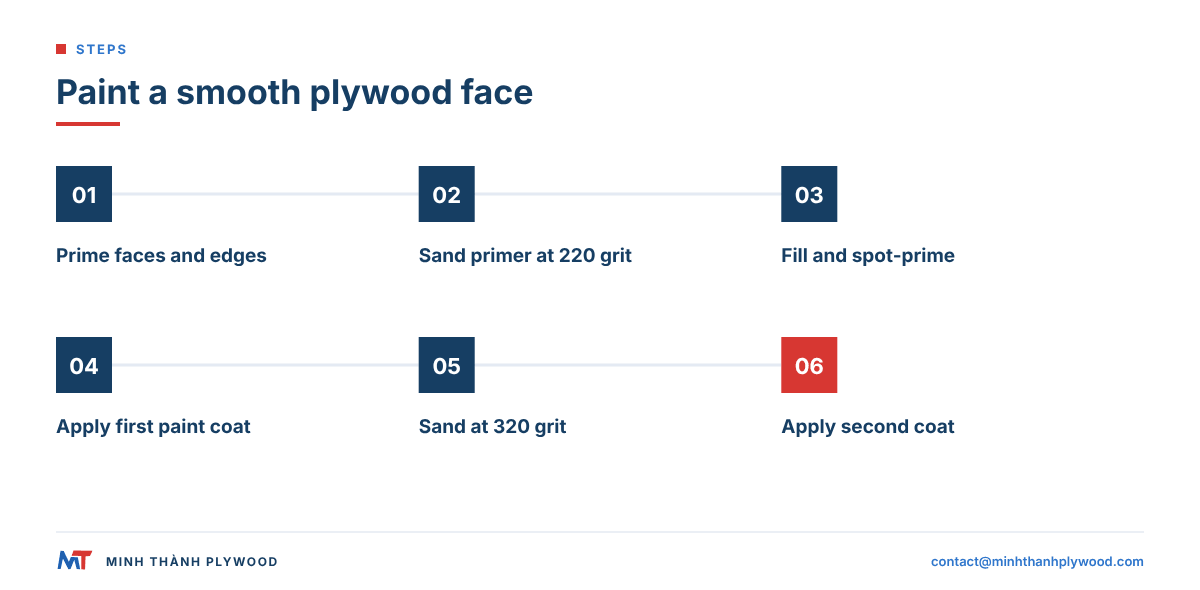
To paint plywood, sand at 150 to 180 grit, apply a stain-blocking primer, sand lightly at 220, then apply two thin coats of a water-based enamel or an alkyd paint. Primer is what stops the grain from raising and the patches from showing through.
- Prime the faces and edges with a stain-blocking primer; edges take a second coat.
- Sand the primer lightly at 220 grit once it is dry, to knock down raised fibres.
- Fill again where the primer shows small dents; prime the filler.
- Apply the first coat with a foam roller or a sprayer, in one direction.
- Sand at 320 grit and wipe off the dust.
- Apply the second coat and let it cure fully before use.
Poplar and eucalyptus faces with a B/B grade are the usual choice for painted furniture, because the paint hides colour differences and tight patches. The full method, with primer types and paints for kitchens and walls, is in how to paint plywood.
Staining plywood without blotches
Plywood takes stain unevenly because its thin rotary-cut face has areas of open and closed grain: apply a pre-stain conditioner or use a gel stain, test on an offcut of the same sheet, and seal the stain with a clear coat. Never stain a face you have not tested.
- Condition first. A washcoat of thinned sealer or a wood conditioner evens out absorption, above all on birch, poplar and pine.
- Use gel stain on blotch-prone faces; it sits on the surface rather than soaking in.
- Wipe off the excess after the time on the can, in the direction of the grain.
- Seal with a clear coat: stain colours the wood but does not protect it.
Engineered veneer and pre-coloured faces often need no stain at all. The plywood staining guide compares stain types and colours by face species.
Food-safe finishes for plywood
Food-safe finishing on plywood means a finish that is non-toxic once dry, used on a panel with a formaldehyde-controlled glue. Cutting boards, serving trays, children’s furniture and shelves that hold food are the cases. Mineral oil, pure tung oil and hard-wax oils sold as food-safe soak in and are re-oiled as they wear; a film finish such as General Finishes Wood Bowl Finish is non-toxic when dry and cured, and is cut and wiped less often.
Two points for plywood. The finish only covers the surface, so the glue line matters as well: Minh Thanh furniture plywood is made with UF glue at E0 emission and is for dry interior use, so keep it off wet worktops and seal every edge. Allow the full cure time on the tin before any food contact.
Oil and hard-wax oil: the natural look
Oil finishes soak into the face and leave the wood looking natural: a penetrating oil such as tung or Danish oil for decorative panels, and a hard-wax oil for furniture and shelves that need more protection. Both are easy to repair, and both wear faster than a film finish.
Apply hard-wax oil, such as Osmo Polyx-Oil, in two thin coats with 8 to 10 hours between them:
- Sand to 180 grit and remove all dust.
- Apply a thin coat with a pad or roller, working it into the grain.
- Wipe off any excess after the time on the tin.
- Let it dry overnight, then buff lightly and apply the second coat.
Oiled plywood darkens and warms the face, more on pine and birch than on EV. Spot repairs are simple: sand the worn area lightly and re-oil it, with no visible lap. Oiled rags can self-heat; dry them flat outdoors or keep them in water before disposal.
Varnish and polyurethane: the hard-wearing clear finish
Polyurethane varnish is the most durable clear finish for plywood furniture, cabinets and floors: three thin coats, with a light sanding between them, give a hard film that resists water, wear and cleaning. Water-based polyurethane stays clear; oil-based ambers and is tougher.
- Seal coat. Thin the first coat as the maker allows, or use a sanding sealer.
- Sand at 220 to 320 grit when dry, to remove raised grain and dust nibs.
- Second coat in long, even strokes with the grain.
- Sand again lightly and clean.
- Third coat, the final film; a fourth on worktops and floors.
Seal both faces and all edges with the same number of coats so the panel takes up and releases moisture evenly. A finish on one face only is a common reason for cupping. The guide to varnish, polyurethane and epoxy on plywood compares the products.
Lacquer and factory UV coating
Lacquer and UV-cured coatings are the production finishes: lacquer is sprayed and dries in minutes, and a UV coating is rolled on and cured under ultraviolet lamps in a factory line for a very hard, even clear film. Both need flat, calibrated panels with even sanded faces.
| Finish | Applied by | Cure | Where it fits |
|---|---|---|---|
| Nitrocellulose lacquer | Spray gun | Air dries fast | Small workshops, repairs |
| Pre-catalysed or 2K lacquer | Spray booth | Chemical cure | Furniture and door production |
| UV-cured coating | Roller line | UV lamps, seconds | Flat panels in volume |
A UV coating line runs panels through rollers and lamps at speed, so the panel itself must be flat and of even thickness. Minh Thanh presses furniture-grade panels twice as standard and holds sanded panels to ±0.2–0.3 mm, down to ±0.2 mm. Both faces are UV-ready for customers who coat on their own line.
Finishing plywood edges
Plywood edges are finished in one of four ways: edge banding, a solid wood lip, filler and paint, or the ply edge left on show under a clear coat. Edges absorb finish faster than faces, so whichever method you use, seal them with an extra coat.
| Method | Look | Wear | Best for |
|---|---|---|---|
| Iron-on or hot-melt edge banding | Matches the face | Good | Cabinets, shelves |
| Solid wood lip, glued | Solid timber edge | Very good | Tabletops, worktops, doors |
| Filler and paint | Painted edge | Good | Painted furniture |
| Exposed ply edge, clear finish | Visible layers | Fair | Design pieces, shelves |
An exposed edge looks best when the core is closed and even: stitched core layers and even plies give a clean set of lines with no gaps to fill. The plywood edge banding guide covers tapes, glues and machines. A clean cut is the start of a clean edge, so pair this guide with how to cut plywood cleanly.
How to make plywood smooth between coats
To make plywood smooth, sand once before finishing and lightly between every coat, always with the grain: 150 then 180 grit on the bare face, 220 to 320 grit between coats. The sealer coat raises the grain, and the light sanding after it gives the smooth feel.
Four rules keep the face intact:
- Do not sand through. Face veneers are thin; sand lightly by hand or with a random orbital sander at low pressure, never with a belt sander on the face.
- Use the right grit order. Skipping from 120 to 240 leaves scratches that show under a clear finish.
- Remove dust between steps. Dust in a coat leaves nibs that need more sanding later.
- Wet the grain for water-based finishes. Wipe the face with a damp cloth, let it dry and sand at 220 before the first coat.
Minh Thanh sands and polishes the faces at the factory, so the panel arrives ready for the light on-site sanding and not the heavy levelling a rough face needs.
Finishing plywood walls and wall panels
Finish plywood walls with a clear water-based finish for a natural look or with primer and paint for colour, after the joints are sanded flush and fixings filled. Most of the work is in how the panels are fixed and jointed, not in the coating.
- Fix the panels with a small gap at the joints, or plan cover strips, so the sheets can move with humidity.
- Fill screw or nail heads with a matching filler for clear finishes.
- Sand the joints and the face lightly at 180 grit.
- Apply a sealer coat, sand at 220, then one or two finish coats.
Choose a matt or satin sheen on walls: gloss shows every dent and roller mark. Grades, thickness and fixing are covered in the plywood wall panels guide.
Outdoor plywood finishes
Outdoor plywood needs an exterior panel and an exterior coating system: exterior primer and paint, or a film-faced panel, with every edge and fixing hole sealed. A clear interior varnish breaks down in sunlight and lets water into the face.
- Panel first. Use exterior plywood with a melamine-fortified or phenolic (WBP) glue; interior UF-glued panels are not built for weather. The BSI description of BS EN 636:2012+A1:2015 covers plywood for dry, humid or exterior conditions.
- Prime all faces and edges, including the back and the cut ends, before fixing.
- Paint with an exterior acrylic in two coats; recoat when the paint starts to chalk or crack.
- Seal fixings and cut ends again after installation.
Film-faced plywood brings its own coating, a phenolic film pressed onto both faces. For the panel choice by exposure, see plywood for outdoor use.
Plywood finish faults and how to fix them
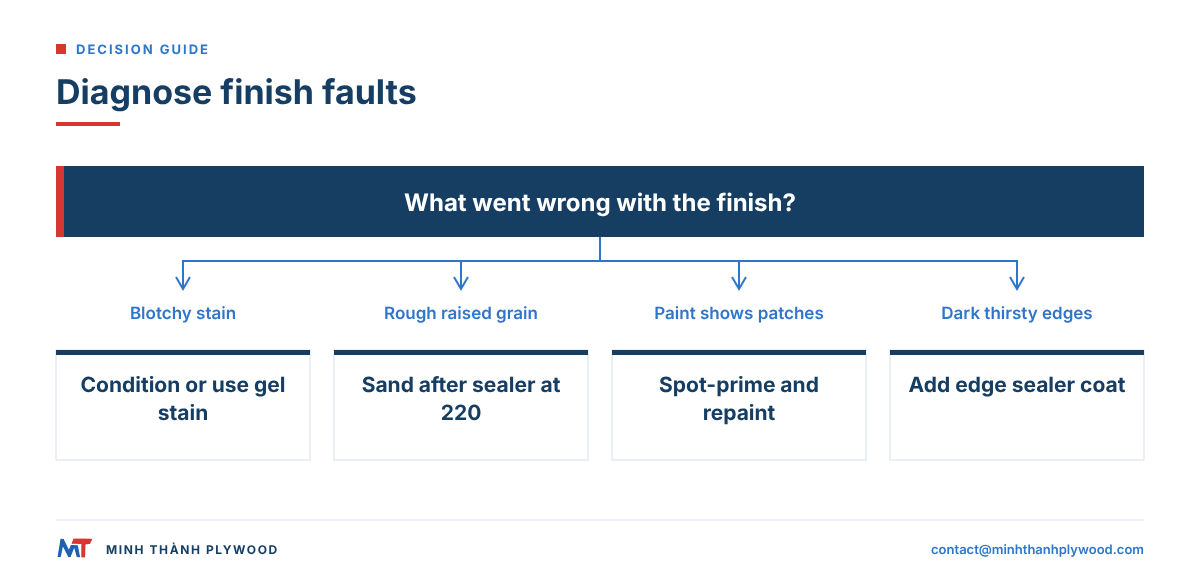
Most plywood finish faults have one cause each, and the fix depends on whether the cause was the panel, the prep or the coating. The table lists the eight faults workshops see most.
| Fault | Usual cause | Fix |
|---|---|---|
| Blotchy stain | Uneven absorption on the face | Conditioner or gel stain; test first |
| Raised, rough grain | Water-based coat on unwetted face | Sand at 220 after the sealer coat |
| Patches show through paint | No stain-blocking primer | Spot-prime, then repaint |
| Sanded through the face | Too coarse a grit, belt sander | Repair with veneer or paint the part |
| Cupping after finishing | Finish on one face only | Coat both faces and edges equally |
| Dust nibs in the film | Dust left between coats | Sand at 320, clean, recoat |
| Peeling paint | Dust, wax or wet panel under the paint | Sand back, dry, prime and repaint |
| Dark, thirsty edges | Edges not sealed | Extra sealer coat on edges |
Write down what you used on the first good panel, from grit to coats, and repeat it for the whole job.
What this means for your order
Order the face grade and the panel quality for the finish you plan: clear finishes need an even face grade and flat, sanded panels, paint needs a sound B/B face, and outdoor finishes need an exterior glue. A furniture line written for a clear UV or lacquer finish reads:
18 mm furniture plywood, white Styrax core, pressed twice, UF glue at E0 emission, birch D+/D faces sanded and polished, UV-ready both faces, 1220 × 2440 mm, thickness ±0.2–0.3 mm; 1×40HC.
Minh Thanh holds CARB P2 / TSCA Title VI certification (ICTT mill no. 23024). The US limit for veneer-core hardwood plywood is 0.05 ppm under 40 CFR 770.10, so the panel under your finish meets the emission rules US furniture buyers ask for.
For the EU, Regulation (EU) 2023/1464 limits furniture and wood-based articles to 0.062 mg/m³ from 6 August 2026. Start with free samples and run your finish on them before you order. Minh Thanh’s minimum order is one 40HC, with production 15–45 days after the 30% deposit. Send the specification and the finish you plan, and we quote furniture plywood with the face to suit it. More guides are in plywood applications, and plywood for kitchen cabinets covers the cabinet case.
Buyer questions, answered
What is the best finish for plywood?
For furniture and cabinets, a water-based polyurethane or a lacquer gives a clear, hard-wearing film. For a natural matt look use a hard-wax oil; for poplar or utility faces, primer and paint.
How do you make plywood look good?
Start with a good face grade, sand it lightly with the grain, finish the edges with banding or lipping, and apply a clear finish in thin coats with a light sanding between them.
How do you make plywood smooth?
Sand with the grain at 150 then 180 grit, remove the dust, apply a sealer coat, then sand lightly at 220 to 320 grit before the next coat. Do not sand through the thin face veneer.
How do I finish the edges of plywood?
Iron-on or glued edge banding, a solid wood lip, or a filled and painted edge. A visible ply edge can also be sanded and clear-finished as a design feature, with an extra sealer coat because end grain absorbs more.
How do you finish birch plywood?
Sand at 180 grit, then use a clear water-based finish or a hard-wax oil. If you stain it, use a pre-stain conditioner or a gel stain, because birch absorbs stain unevenly and blotches.
Should I seal plywood before painting?
Yes. A primer or sealer stops the face from absorbing paint unevenly and raising the grain, and it seals the edges. Use a stain-blocking primer on faces with knots or patches.
Can you varnish plywood?
Yes. Water-based and oil-based polyurethane varnishes both work on sanded plywood; apply three thin coats, sanding lightly between them, and seal the edges with the same finish.
How do you finish plywood walls?
Sand the joints flush, fill fixings, and apply a clear water-based finish or primer and paint. Leave a small gap at the joints, or fit a cover strip, so the panels can move with humidity.
Can plywood be finished for outdoor use?
Yes, if the panel is an exterior type. Use an exterior primer and paint or a film-faced panel, and seal every edge and fixing hole; a clear interior varnish will not protect plywood outdoors.
What is finish grade plywood?
Plywood with a face good enough to show under a clear finish: a sanded, even face with few, tight repairs. At Minh Thanh that means grades such as A/A or A/B on pine and eucalyptus faces, or D+/D on birch.