
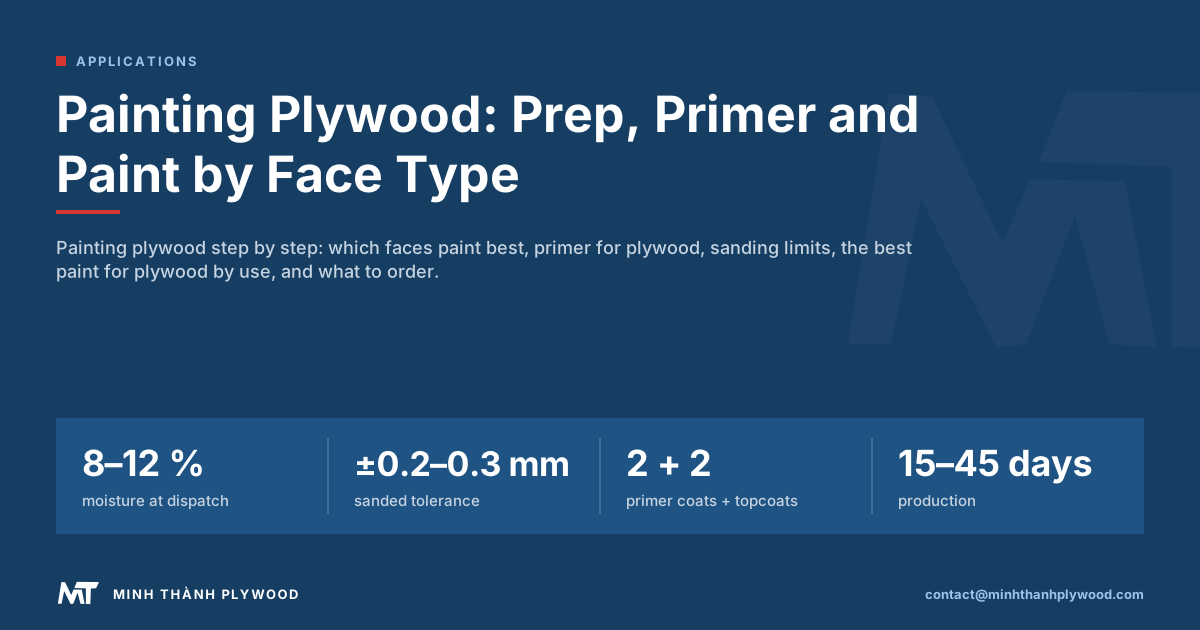
Painting plywood well takes four things: a face that suits paint, a light sand without breaking through the veneer, a primer matched to the wood, and thin coats sanded between. Birch, poplar and engineered veneer faces paint smoothest; pine needs a stain-blocking primer. Minh Thanh Plywood makes sanded, UV-ready furniture panels in Vietnam, and this guide shows how to paint each face.
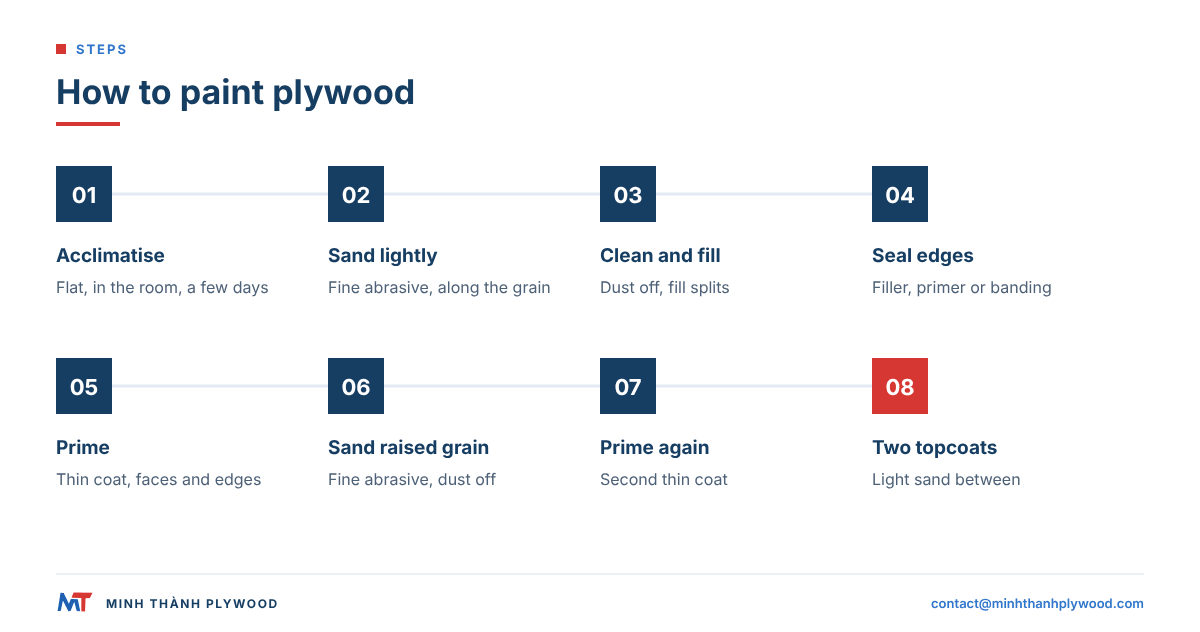
How to paint plywood in 10 steps
Paint plywood in this order: check the panel, sand lightly, fill, prime, sand, prime again, then topcoat twice. The steps below suit furniture, cabinets and interior walls; the paint maker’s label sets the drying times.
- Let the panel acclimatise in the room for a few days, flat on bearers. Our panels leave the factory dried to 8–12 % moisture content, the normal range for furniture plywood.
- Check the face in raking light for splits, open joints and repairs.
- Sand lightly along the grain with fine abrasive. A factory-sanded face needs a scuff, not a resurfacing.
- Remove the dust with a vacuum and a tack cloth or damp microfibre cloth.
- Fill splits, small holes and repairs with a fine filler, then sand flush.
- Seal the edges with filler, extra primer coats or edge banding.
- Apply the first primer coat thin and even, faces and edges.
- Sand the raised grain once the primer is dry, with fine abrasive, and dust off.
- Apply the second primer coat, then a light sand if any texture remains.
- Apply two thin topcoats, with a light sand between them, and leave the paint to cure before heavy use.
Thin coats give a better plywood painting result than heavy ones. A thick coat sags, dries slowly and shows brush marks.
Do you need to prime plywood before painting?
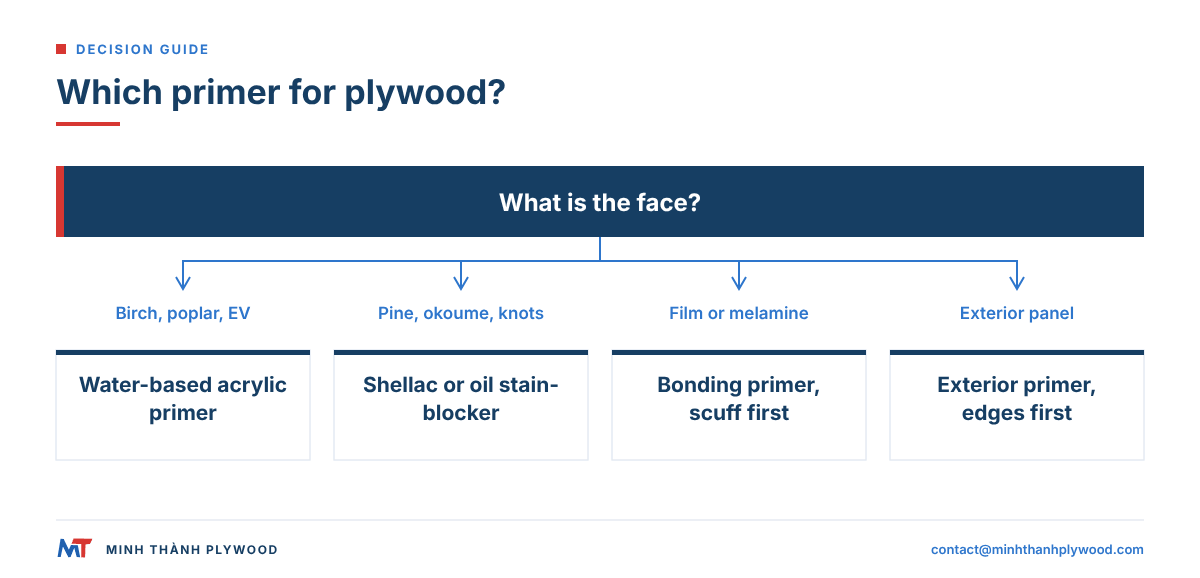
Yes: priming plywood is the step that decides the finish. Primer seals the open grain and the end grain, blocks tannins and resin that would bleed through light paint, and gives the topcoat an even surface to grip. Unprimed plywood soaks up the first coat unevenly and shows the grain through the paint.
Choose the primer for plywood by face and by exposure:
| Face or situation | Primer | Why |
|---|---|---|
| Birch, poplar, engineered veneer (EV) | Water-based acrylic or high-build wood primer | Tight grain, few extractives, fast drying |
| Pine, okoume, knotty or resinous faces | Shellac-based or oil-based stain-blocking primer | Stops resin and tannin bleeding through |
| Light colours over dark faces | Stain-blocking primer, tinted grey or white | Fewer topcoats to hide the face |
| Film-faced or melamine-faced panels | Bonding primer for slick surfaces | Phenolic and melamine are non-porous |
| Exterior plywood | Exterior acrylic or oil-based primer | Flexible, water-resistant base |
Prime the edges and the back as well as the face. Primer only on the visible face leaves the panel unbalanced and the edges thirsty.
Which plywood faces paint best?
Tight, even, fine-grained faces paint best: birch, poplar and engineered veneer. Open-grained or resinous faces such as pine and okoume paint well too, but need a stain-blocking primer and more filling.
| Face | How it paints | Prep and primer | Grade to order for paint |
|---|---|---|---|
| Birch | Fine, closed grain; very smooth finish | Light sand, water-based primer | D/E is enough for an opaque finish |
| Poplar | Soft, even, pale; takes primer evenly | Light sand, high-build primer | B/B (BB/CC by Chinese code) |
| Engineered veneer (EV) | Uniform, no knots | Light sand, water-based primer | Standard EV face |
| Eucalyptus | Hard, fine texture | Light sand, primer two coats | B/B for paint or overlay |
| Pine | Grain and knots show; resin can bleed | Shellac or oil-based stain-blocker | A/B or B/B; B/C for hidden parts |
| Okoume | Soft, pinkish, open | Filler or high-build primer | By approved sample |
The grade ladder exists so you pay only for what shows. For an opaque finish, small colour variation and sound repairs in the face do not matter; open splits and overlaps do. Our poplar plywood and birch plywood pages list the face grades.
Grain telegraphing, raised grain and core print-through
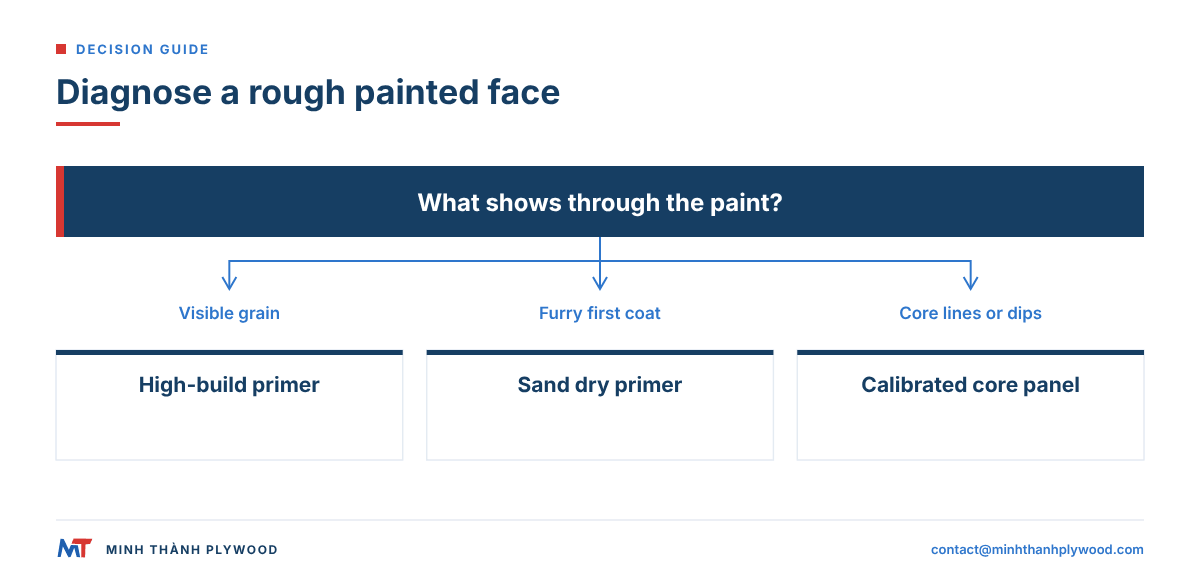
Three different faults make painted plywood look rough or uneven, and each has its own fix. Find which one you have before adding more paint.
- Grain telegraphing: the face’s growth rings or open pores show through the dried paint. Fix: a high-build primer, sanded flat, before the topcoat; a tighter face such as birch or EV next time.
- Raised grain: the surface feels furry after the first water-based coat, because wood fibres swell and stand up. Fix: sand lightly after the first primer coat; it does not come back once sealed.
- Core print-through: lines or dips that follow the core veneers or gaps under a thin face. Fix: it is a panel fault, not a paint fault; order a calibrated core and a sanded face.
Core print-through is where the panel’s build matters. Our furniture-grade panels are pressed twice as standard: the core board is pressed and calibrated, then face and back are pressed on. The core layers are stitched both horizontally and vertically, so gaps between core strips do not telegraph through the face.
How far can you sand plywood before painting?
Sand plywood before painting only enough to scuff the surface and remove marks; never try to level the panel by sanding. The face veneer is thin, and sanding through it exposes the cross-band layer, which no paint hides.
Painting sanded plywood is easier because the factory has already done the levelling. Our faces are sanded and polished, and sanded furniture panels are held to a thickness tolerance of ±0.2–0.3 mm, so a light scuff with fine abrasive is all the face needs.
- Use fine abrasive along the grain, by hand block or random orbital sander.
- Keep the sander flat and moving; tilting it digs through at edges.
- Stop at the first sign of a different colour: that is the layer below the face.
- Sand between coats with finer abrasive, only to knock down nibs and raised grain.
Our guide on how to sand plywood sets out the full sanding sequence.
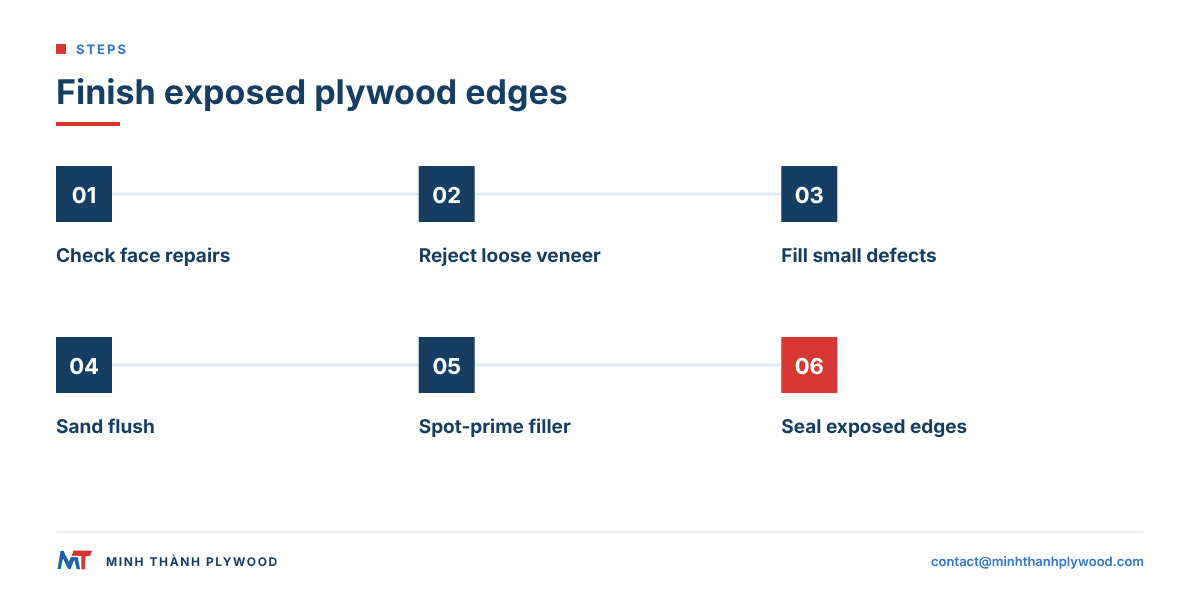
Filling face repairs, splits and edges
Fill small splits, holes and open joints with a fine, sandable wood filler before priming, then sand it flush. Filler hides surface marks; it does not repair a loose face or a void in the core.
- Press on every repair and split: a sound repair is flat and firm; a blister or a hollow sound means a bond fault.
- Reject lifting faces rather than filling them; paint over a loose face cracks along the edge.
- Fill in thin layers, letting each dry, and sand flush with the face.
- Spot-prime the filler, then prime the whole panel, so the filler does not show as a dull patch.
Plywood edges need their own treatment, because every ply shows end grain there. Fill the edge with filler and several primer coats sanded between, or cover it with edge banding or solid lipping. Our guide on how to finish plywood edges compares every edge option.
Best paint for plywood: paint types compared
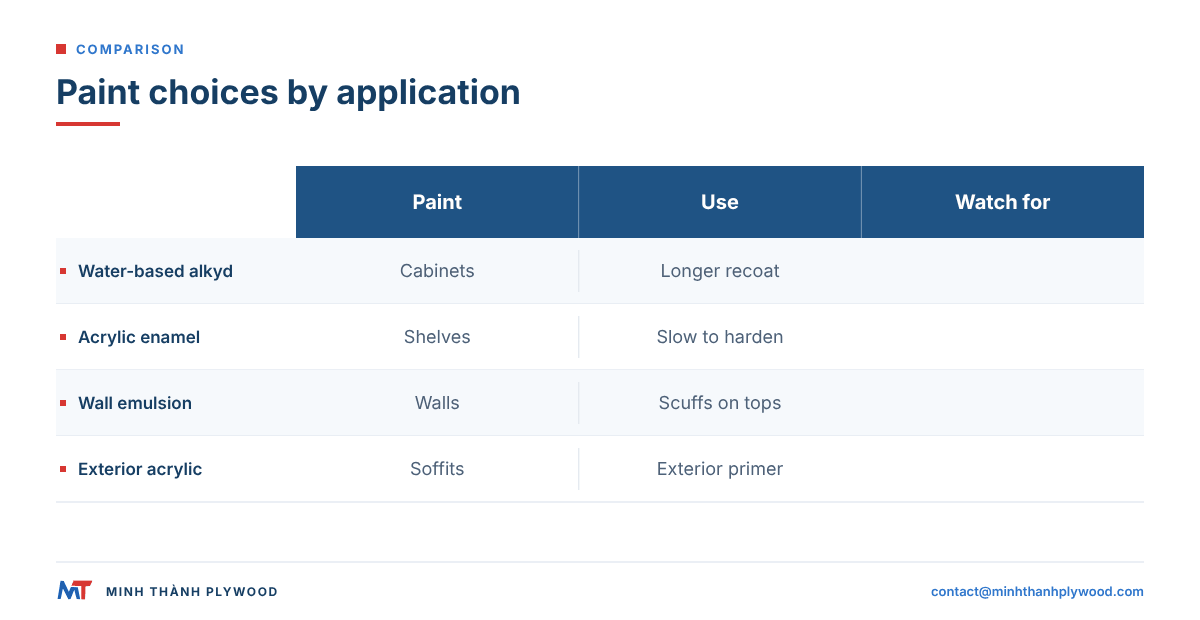
The best paint for plywood is a hard, levelling enamel for furniture and cabinets, an acrylic emulsion for walls and ceilings, and an exterior acrylic outdoors. Match the paint to the wear the surface gets.
| Paint | Finish | Hardness | Best use | Watch for |
|---|---|---|---|---|
| Water-based alkyd enamel | Smooth, levels well | High | Cabinets, doors, furniture | Longer recoat than acrylic |
| Acrylic enamel | Good | Medium to high | Shelving, furniture, interior joinery | Can stay slightly soft for days |
| Oil-based enamel | Very smooth | Very high | Trim, high-wear parts | Yellows in the dark, strong smell |
| Acrylic emulsion (wall paint) | Matt to satin | Medium | Plywood walls and ceilings | Scuffs on furniture tops |
| Exterior acrylic | Satin | Medium, flexible | Sheds, soffits, signs | Needs exterior primer under it |
| Two-component polyurethane paint | Very smooth, hard | Very high | Factory lines, shop fittings | Spray only, needs ventilation |
For painted cabinetry, water-based alkyd enamels are now a common professional choice: they flow out like oil paint and clean up with water. The paint system’s own primer is the safest base.
How do you get a smooth paint finish on plywood?
Spraying gives the smoothest paint finish on plywood, a short-nap or foam roller comes next, and a brush is best kept for edges and corners. Whatever the tool, thin coats matter more than the tool.
- Spray (HVLP or airless): flattest finish, fastest on many panels, needs masking and ventilation. Factory finishing lines spray or roll-coat. In the US, spray finishing falls under OSHA standard 1910.107.
- Foam or short-nap roller: fine texture, little brush mark, good for large faces and walls.
- Brush: for edges, inside corners and touch-up; lay off the last stroke along the grain.
Roll or spray the faces flat on trestles where you can. Paint flows out on a horizontal panel and runs on a vertical one.
Painting plywood white without bleed-through
Painting plywood white needs a stain-blocking primer on any face with tannins, knots or resin, because white shows every yellow or brown bleed. On birch, poplar and EV faces, a good white primer and two topcoats are usually enough.
- Pine and knotty faces: shellac-based primer over the knots, then over the whole face.
- Okoume and other red-toned faces: two primer coats before the white topcoat.
- Choose a non-yellowing topcoat: water-based acrylic and water-based alkyd stay whiter than solvent alkyd indoors.
- Look in daylight after the first topcoat; bleed shows as yellow shadows over knots and repairs.
White painted plywood is a common request for shop fittings and wall panels. For that work, order a face that needs the least filling, such as poplar, birch or EV.
Painting plywood walls and ceilings
Painting plywood walls follows the same steps as furniture with less sanding: fill the screw heads and joints, prime the sheets and roll two coats of wall paint. Fix the sheets before you prime the joints.
- Fix the sheets first, with screw heads set just below the surface and filled.
- Decide on the joints: a visible V-groove or shadow gap, or filled and taped joints for a flat wall.
- Prime before fitting where you can, including the backs and edges in damp rooms.
- Use an acrylic emulsion on walls and a harder enamel on ceilings that get handled or splashed.
Our guide to plywood wall panels covers thicknesses, fixing and joints for plywood walls.
Can you paint film-faced or melamine-faced plywood?
You can, but phenolic film and melamine are made to repel coatings, so paint adhesion is the weak point. Scuff the surface, degrease it and use a bonding primer made for slick surfaces, then test on an offcut before committing.
- Clean with a degreaser and let it dry.
- Scuff sand the whole surface with fine abrasive until the gloss is gone.
- Prime with a bonding primer for glossy or laminate surfaces.
- Topcoat with acrylic or alkyd enamel once the primer has cured.
- Test adhesion: cut a small crosshatch on an offcut, press tape on and pull it off.
For an outdoor surface that must be painted, a paint-grade overlay such as MDO is the better start than film-faced plywood. Our comparison of HDO vs MDO plywood explains the difference.
Primed plywood vs raw sanded panels: what to order
Primed plywood saves a coat on site, but most furniture makers and finishing lines buy raw sanded panels and prime them in their own system. That way primer and topcoat come from the same paint maker and are known to work together.
We supply raw panels with sanded and polished faces. Both faces are UV-ready, made to the standard customers need to apply their own UV coating, and the same smooth face suits a primer and paint line.
- Order raw sanded faces when your line primes and paints, or when you choose the paint system yourself.
- Order the grade that matches the finish: paint-grade faces cost less than clear-finish faces.
- Ask for a free sample in the grade and thickness you will order, and run your own paint system on it.
Painting a plywood floor
Paint a plywood floor with a stain-blocking primer and two or three coats of porch and floor enamel, and leave it to cure before furniture goes back. Floors take scuffs and point loads, so the system matters more than on a wall; Brad the Painter lays out the same sequence.
- Sand in two passes: 100 grit to level the surface, then 150 to 220 grit for a smooth base. Vacuum and wipe off the dust.
- Fill screw heads and gaps with filler, and run latex caulk into the seams after priming so the joints can move.
- Prime with a stain-blocker. Knots in lower grades carry resin that bleeds through ordinary primers and many topcoats; a shellac or oil-based blocker such as Zinsser BIN or Kilz Original stops it. Knotty or lower-grade faces are the reason for this step.
- Topcoat with floor enamel, two or three thin coats: Benjamin Moore Floor and Patio Enamel or Ultra Spec Porch and Floor, or a Kilz Tribute semi-gloss for lighter wear. Satin or semi-gloss wipes clean and hides scuffs better than gloss.
- Cure before use. Light foot traffic comes sooner than furniture; follow the label for the days before heavy items and rugs go on.
For stencils, let the base coat harden first, then tape and dab thin coats so paint does not creep under the stencil.
Painted floors suit a sanded face with no open splits, which is why a calibrated, sanded panel saves filling time.
Painting on plywood as an artist
Artists paint on plywood panels after sealing the surface, because bare wood pulls tannins and moisture into the paint and discolours it over time. Seal first, then ground, as Just Paint advises for acrylics and oils.
- Acrylic paints: seal with two or more coats of gloss medium or acrylic gesso first, to reduce discolouration from the wood.
- Oil paints: apply three or more coats of acrylic gesso so the wood does not absorb the oil, then sand lightly between coats.
- Seal the back and edges too, and brace large panels with a frame so they stay flat.
- Choose a birch or poplar face with no open splits; thin, tight grain gives a smooth ground with less gesso.
Painting exterior plywood
Exterior plywood takes paint best of all outdoor finishes, because pigment blocks the sunlight that greys and checks bare wood. Start with a panel whose glue is rated for exterior use, seal every edge, then prime and paint both faces.
- The bond comes first: exterior or CDX-type plywood with water-resistant melamine-fortified or phenolic (WBP) glue, not interior UF-bonded furniture plywood.
- Seal edges and holes with primer or sealer before the faces.
- Use an exterior primer and two coats of exterior acrylic.
- Repaint before the film cracks; bare spots let water in behind the paint.
The US Forest Products Laboratory’s Wood Handbook (FPL-GTR-282, 2021) treats paint as the most protective outdoor finish for wood because it blocks ultraviolet light. Our exterior plywood page lists the build.
Drying, recoat and cure times
Water-based primers and paints are usually ready to recoat within a few hours, solvent alkyds overnight, and every paint takes days to reach full hardness. The paint maker’s label is the rule; the table shows the usual order.
| Product | Touch dry | Recoat | Full hardness |
|---|---|---|---|
| Water-based acrylic primer | Under an hour | A few hours | About a day |
| Shellac-based primer | Minutes | About an hour | Same day |
| Water-based alkyd enamel | A few hours | Overnight | One to three weeks |
| Acrylic emulsion | About an hour | A few hours | About two weeks |
| Oil-based enamel | Several hours | Overnight or longer | Several weeks |
Cold, damp air slows every stage. Do not stack painted panels face to face before the paint has hardened, or they stick together.
Paint both faces of free panels
Paint or seal both faces of any plywood part that is free to move, such as doors, shelves, loose panels and table tops. A coating on one face only lets that face take up moisture more slowly than the other, and the panel can cup.
- Same number of coats on both faces; the back can be primer and one coat.
- Edges count too: they take up moisture fastest.
- Fixed panels screwed to a frame on all edges are less sensitive, but still benefit from a sealed back in damp rooms.
A balanced panel helps: an odd number of plies, face and back of the same species, and a core pressed and calibrated before the faces go on.
Checks before you accept a painted finish
Check a painted plywood sample under raking light and by hand before you approve a production run. Five checks catch most problems.
- Grain: no telegraphing at arm’s length in raking light.
- Edges: no visible end-grain texture or sheen change at the edge.
- Repairs: filled repairs and patches invisible after the topcoat.
- Adhesion: a crosshatch cut on an offcut, with tape pulled off, lifts little or no paint.
- Flatness: the painted panel lies flat after a few days indoors.
Keep the approved painted sample. It becomes the reference for incoming panels, and our quality control checks raw panels against the approved sample of the face before loading.
What this means for your order
Order plywood for painting by the face it needs, not the most expensive grade. Send these lines with your request:
- Application: painted furniture, cabinets, shop fittings, wall panels or exterior use.
- Face and grade: birch D/E, poplar B/B, EV, eucalyptus B/B or pine B/B, matched to an approved sample.
- Core: white Styrax or Eucalyptus as standard.
- Glue and emission: UF glue at E0 emission for interiors; melamine-fortified or phenolic (WBP) glue to your specification for exterior work.
- Size and thickness: 1220 × 2440 mm or 1250 × 2500 mm, 3–40 mm.
- Packing and quantity: from one 40HC, mixed specifications by agreement.
For the US, hardwood plywood with a veneer core must meet the formaldehyde limit in the EPA formaldehyde emission standards, which is why the order line names the emission class.
Production takes 15–45 days after the deposit, and every shipment is photographed and filmed before loading. Ask for free samples to test your paint system, or see our furniture plywood from Vietnam range and the pillar guide on how to finish plywood.
Buyer questions, answered
Do you need to prime plywood before painting?
Yes. Primer seals the open grain, stops tannins and resin bleeding through, and gives the topcoat an even surface to grip. Unprimed plywood soaks up the first coat unevenly and shows the grain through the paint.
Can you paint plywood?
Yes. Sanded hardwood-faced plywood such as birch, poplar or engineered veneer takes paint very well. Sand lightly, prime, sand the raised grain, then apply two thin topcoats.
What is the best paint for plywood?
Indoors, a water-based alkyd or acrylic enamel gives a hard, smooth finish on furniture and cabinets. On walls and ceilings, a good acrylic emulsion over primer is enough. Outdoors, use exterior acrylic paint over an exterior primer.
How do you get a smooth paint finish on plywood?
Choose a tight-grained face, sand with fine abrasive along the grain, fill any splits, prime twice and sand after the first primer coat. Then roll or spray thin topcoats and sand lightly between them.
Why does the grain show through paint on plywood?
Grain telegraphing happens when the face veneer's open grain or growth rings are not sealed before the topcoat. A high-build primer, sanded smooth, fills the grain so the paint dries flat.
Can you paint plywood without primer?
Only for rough utility work. Without primer the first coat soaks in unevenly, raises the grain and leaves a blotchy sheen, so you spend more paint and get a worse finish.
Can you paint film-faced plywood?
Phenolic film resists paint because it is smooth and non-porous. If you must, scuff it with fine abrasive, clean it and use a bonding primer made for slick surfaces, then test adhesion on an offcut.
How many coats of paint does plywood need?
Usually two primer coats and two topcoats. Light colours over dark or knotty faces may need a third topcoat; the stain-blocking primer matters more than extra paint.
What sandpaper grit should I use before painting plywood?
Use fine abrasive on a sanded factory face, typically 150 to 180 grit along the grain, and 220 grit between coats. Avoid coarse grits on thin face veneers, which can sand through.
How do you paint plywood edges?
Fill the end grain with filler or several primer coats sanded between, or cover it with edge banding or solid lipping first. Then paint edges and faces together.
Should you paint both sides of plywood?
Yes, on any panel that can move freely, such as a door, shelf or loose panel. Coating one face only lets the two faces take up moisture at different rates, and the panel can cup.
Can you paint a plywood floor?
Yes. Sand to 100 then 220 grit, fill seams with latex caulk after a stain-blocking primer, then roll two or three coats of porch and floor enamel and let it cure before furniture goes back.
How do you prepare plywood for acrylic or oil painting?
Seal it first. For acrylics, apply two or more coats of gloss medium or gesso; for oils, three or more coats of acrylic gesso, so the wood does not discolour the paint or absorb the oil.