
There are six ways to finish plywood edges: leave them exposed and sanded, fill and paint them, cover them with veneer tape, band them in PVC or ABS, glue on solid lipping, or hide them in a mitre. The choice depends on the look, the wear and the budget. Minh Thanh Plywood makes furniture plywood with stitched, calibrated cores in Vietnam; this guide compares every edge.
How to finish plywood edges: every option compared
The six ways to finish plywood edges differ in look, cost and durability. Exposed edges cost least, solid lipping and mitres look best and last longest, and banding sits in between.
| Edge treatment | Look | Cost | Durability | Skill or tools | Best for |
|---|---|---|---|---|---|
| Exposed and sanded | Visible plies | Lowest | Medium | Sander | Modern furniture, shelving |
| Filler and paint | Same as painted face | Low | Medium | Filler, primer | Painted furniture, wall panels |
| Iron-on veneer tape | Matches the face species | Low | Low to medium | Iron, trimmer | Shelves, cabinet carcasses |
| PVC or ABS banding | Solid colour or wood print | Medium | High | Edge bander | Kitchen, office, laminated parts |
| Solid wood lipping | Solid timber edge | Medium to high | Very high | Glue, clamps, plane | Table tops, shelf fronts, doors |
| Mitre or fold | No edge visible | High | High | Precise saw | Boxes, high-end cabinets |
Decide the edge before cutting. Lipping changes the finished size of a part, and banding needs an allowance for trimming.
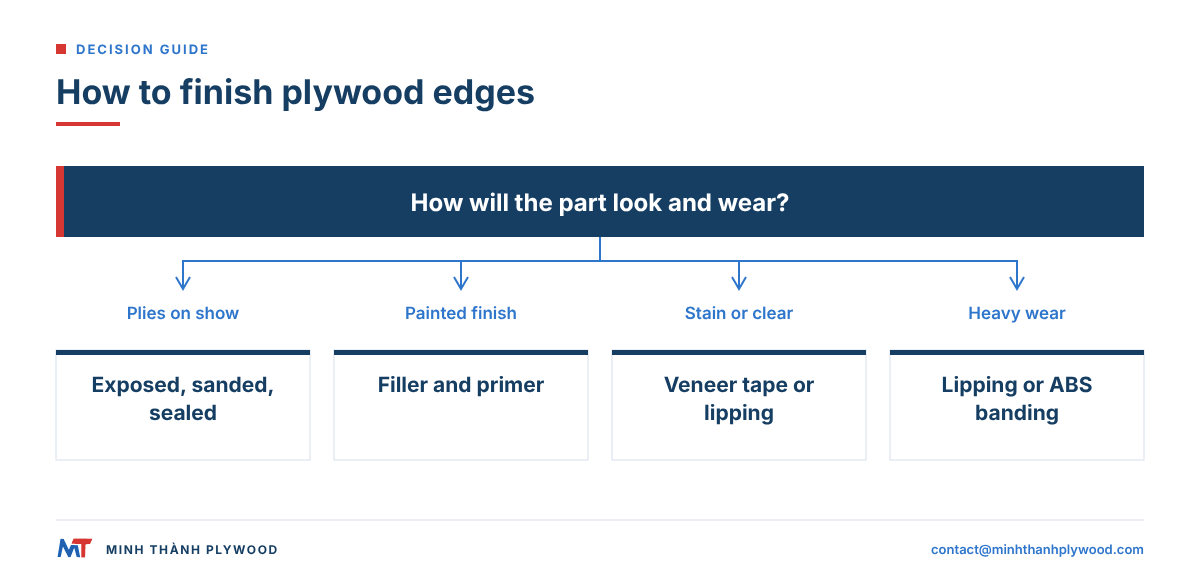
Painted plywood edges: why paint the edges of plywood?
Paint or seal plywood edges because the edge is end grain: it takes up water, finish and dirt many times faster than the face. An unsealed edge swells, darkens and lets moisture reach the glue lines between plies, so the panel loses its flat, even shape.
- Moisture: water enters the edge first, so a sealed edge keeps the panel flat and stable.
- Look: an unsealed edge drinks paint and stays dull and rough next to a smooth face.
- Cleaning: a sealed edge wipes clean; bare end grain holds dirt.
- Durability: primer and paint bind loose fibres at the arris.
Seal hidden edges too. Cabinet backs, holes for hinges and cut-outs for sinks are edges as well.
How do you finish exposed plywood edges on furniture?
An exposed plywood edge works on furniture when the core is even, gap-free and flat, so the plies read as clean stripes. A core with gaps, overlaps or uneven layers looks rough and cannot be sanded clean.
Three things make an edge good enough to show:
- Stitched core layers: our core layers are stitched both horizontally and vertically, so the strips in each core layer sit tight and the edge shows continuous plies.
- Calibrated core: our furniture-grade panels are pressed twice as standard: the core board is pressed and calibrated, then face and back are pressed on. The plies stay straight and parallel at the edge.
- Even core species: white Styrax or Eucalyptus cores are standard, giving pale, even stripes.
Our cut-to-size service cuts one panel into 4, 6 or 8 pieces, so parts arrive with clean, square edges. See our cut-to-size plywood page.
How to sand and seal an exposed edge
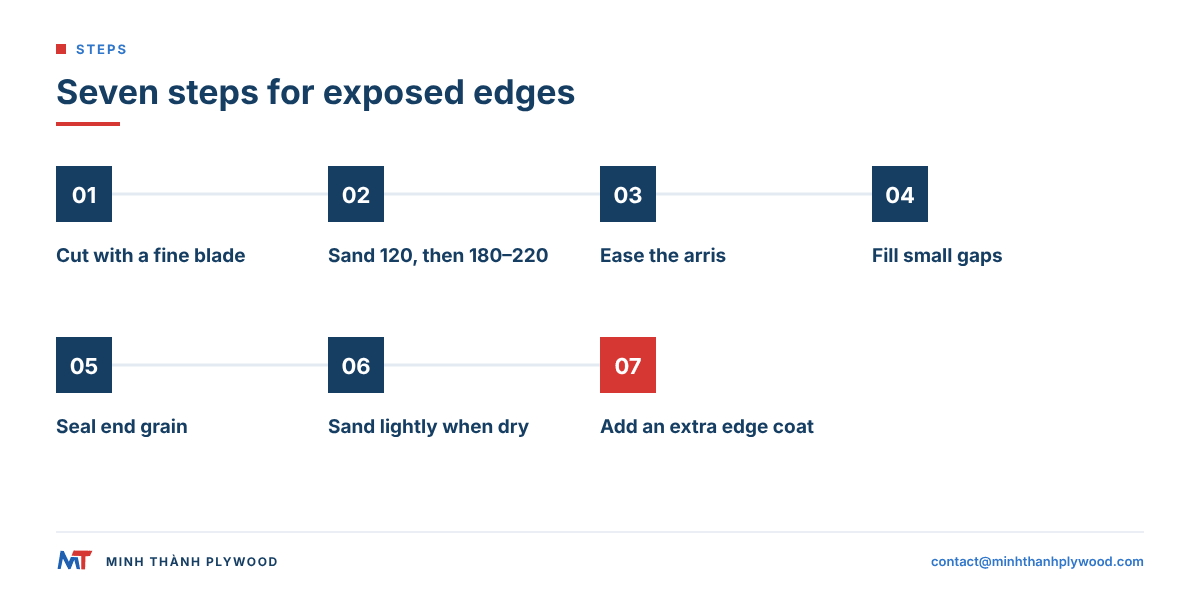
Sand an exposed plywood edge flat with a block, ease the arris and seal it with the same finish as the face. Seven steps give a smooth, clean edge.
- Cut cleanly with a sharp, fine-tooth blade or a router to avoid tear-out.
- Sand flat with a hard block, moving along the edge: 120 grit first, then 180 to 220 grit. Keep the block flat so the corners do not round.
- Ease the arris with a light chamfer or round over so the face veneer cannot chip.
- Fill any small gap with a filler close to the core colour.
- Seal the edge with a thinned first coat of the finish, worked into the end grain.
- Sand lightly once dry; edges raise more grain than faces.
- Build the finish with one more coat on the edge than on the face.
Painting plywood edges: the filler and primer method
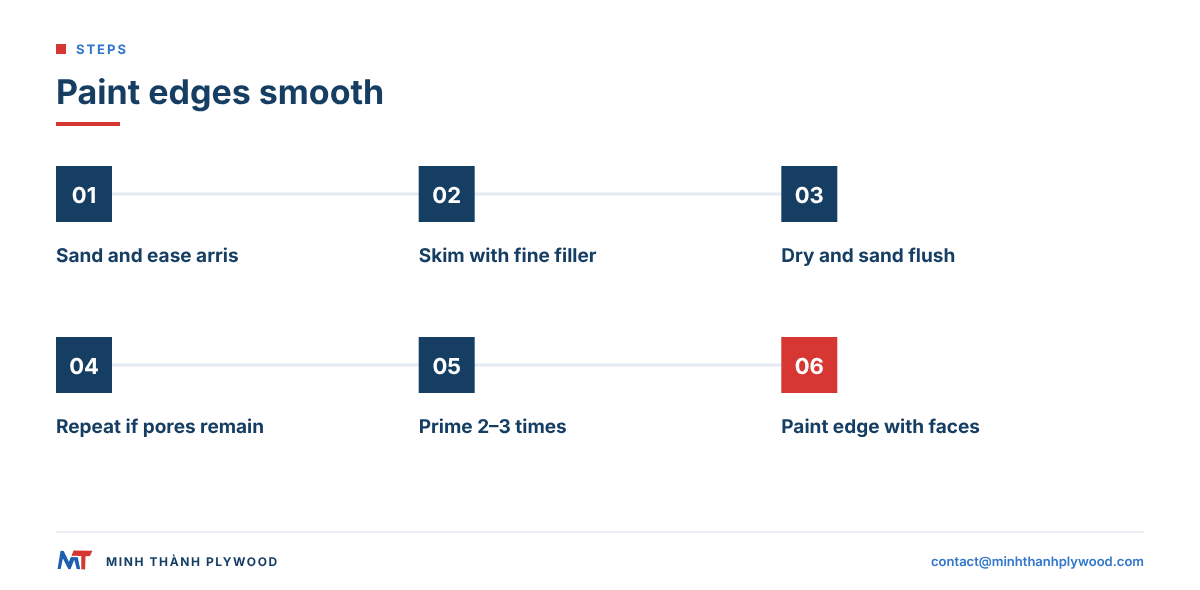
For painted plywood edges, fill the end grain until it is as smooth as the face, then prime and paint the edge with the faces. A filled, primed edge disappears under paint.
- Sand the edge flat and ease the arris slightly.
- Skim the edge with a fine filler, pressed into the end grain with a flexible knife.
- Let it dry and sand flush with a block.
- Repeat if pores or gaps still show.
- Prime the edge two or three times, sanding lightly between coats with 220 grit. Water-based primer raises the grain, so a 220-grit sponge pass leaves the edge as smooth as the face.
- Paint edges and faces together, so the sheen matches.
Painting plywood edges without filler takes many more primer coats and still shows the stripes. Our guide on how to paint plywood covers primer choice and the painting steps.
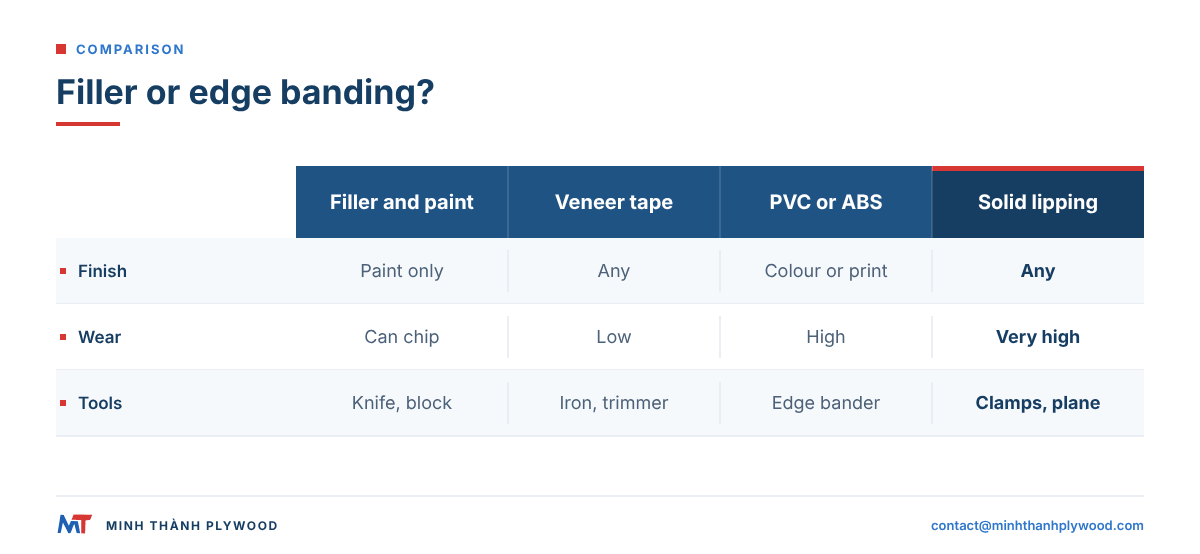
Wood filler or edge banding for plywood edges?
Choose wood filler when the part will be painted and the edge is rarely knocked. Choose edge banding when the edge will be stained, clear-finished or handled often, because banding is harder-wearing and matches the face.
| Filler and paint | Edge banding or lipping | |
|---|---|---|
| Finish | Painted only | Paint, stain, clear or laminate |
| Wear at the edge | Can chip on impact | Holds up to knocks |
| Time per edge | Several coats and sands | One application and a trim |
| Repair | Refill and repaint | Replace a strip |
| Best for | Painted wall panels, cabinet sides | Shelf fronts, doors, tops |
Many workshops combine both: banding on front edges people touch, filler and paint on hidden or back edges.
Iron-on veneer edge tape
Iron-on veneer edge tape is a thin strip of real wood veneer with hot-melt glue on the back. It covers the plies with the same species as the face, cheaply and with simple tools.
- Cut the tape slightly longer than the edge. Buy tape a little wider than the panel: 21 mm (13/16 in) tape suits 3/4 in (19 mm) plywood, so about 1 mm overhangs each side for trimming.
- Iron it on with a household iron on the cotton setting (medium heat), pressing slowly along the edge.
- Roll it with a hard roller while the glue cools.
- Trim the ends and sides flush with a trimmer or a sharp block plane.
- Sand the corners lightly and finish with the face.
Veneer tape is thin and can lift or chip on edges that are knocked. Choose it for shelves and carcasses, and lipping for edges that take wear.
PVC and ABS edge banding
PVC and ABS edge banding are plastic strips applied with hot-melt glue on an edge-banding machine. They give furniture factories a hard, colour-matched edge at production speed.
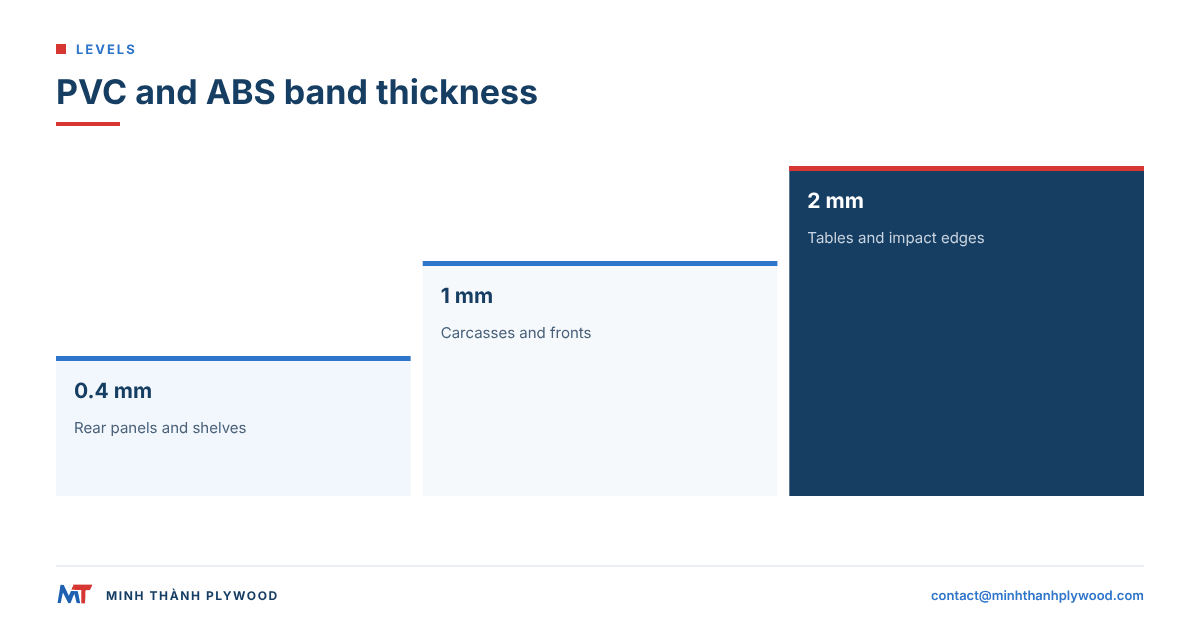
- Thickness: a common split is 0.4 mm for rear panels and shelves, 1 mm for carcasses and fronts, and 2 mm for tables and edges that take impact. Thicker band also lets the machine round the corner with a larger radius.
- Colours: solid colours, wood prints and textures matched to the face or the laminate.
- ABS: contains no chlorine and is easier to recycle; PVC is usually cheaper.
- Machine bond: hot-melt edge banders pre-mill, glue, trim and buff the edge in one pass.
Machine banding needs a flat, square edge with an even core, so the glue line stays thin. Our plywood edge banding guide compares veneer tape, PVC, ABS and lipping in more depth.
Solid wood lipping
Solid wood lipping is a strip of solid timber glued to the edge and planed flush with the faces. It is the most durable edge, and the only one you can shape, round or mould.
- Machine the lipping 6 mm to 19 mm thick for most shelves and tops (thin 6 mm strips look like a fine edge; thicker ones can be shaped), and cut it about 1.6 mm (1/16 in) proud of the panel faces so you plane it flush instead of leaving a gap. Cut it about 25 mm longer than the panel.
- Glue and clamp it to the edge, with cauls to spread the pressure.
- Let the glue cure, then plane or rout the lipping flush with both faces.
- Shape the edge: round over, chamfer or profile.
- Sand and finish with the face.
Shop tips that save clamps and cleanup: put blue masking tape on the panel faces beside the edge before gluing, so squeezed-out glue wipes off the tape; glue lipping to a pair of panels and clamp them face to face so the panels act as cauls; make panels slightly wider than final size and rip to width after the lipping is trimmed; and finish with a sharp block plane, because a flush-trim router bit alone may not leave the edge perfectly flush. For two shelves, glue one wide strip across both panels and rip down the middle.
Match the lipping species to the face: birch or a similar pale timber on birch, a light hardwood on poplar. Our birch plywood page lists the face grades.
How to hide plywood edges with mitres and folds
The cleanest way to hide plywood edges completely is a mitre: two panels cut at 45 degrees and glued so only face veneer shows at the corner. V-groove folding does the same on a production line.
- Mitred corners: precise cutting, glue and clamping; strong with a spline or biscuit.
- V-groove folding: a V cut almost through the panel, glue in the groove, the panel folded into a box with a continuous face.
- Lock mitres: router joints that align and strengthen the mitre.
Mitres need flat, calibrated panels: a small difference in thickness shows as a step at the corner. Our sanded furniture panels are held to a thickness tolerance of ±0.2–0.3 mm.
How do you finish plywood edges for stain or clear coat?
Finishing plywood edges under stain or clear coat needs an edge that takes colour like the face. End grain drinks stain and turns darker, so either band the edge or control its absorption.
- Band the edge with veneer tape or lipping of the same species, then stain edge and face together.
- Condition the end grain: two coats of pre-stain conditioner or a thin wash coat on the edge.
- Use gel stain on edges; it soaks in less than thin stain.
- Clear coat: one extra coat on exposed edges.
Our guide on how to stain plywood covers conditioner and stain choice on each face.
How to seal plywood edges for outdoor use
For outdoor use, seal every plywood edge with two or more coats of exterior primer, sealer or thin epoxy, worked into the end grain, before the faces are painted. Use a panel with an exterior glue line. BS EN 314-2 sets the bonding-quality requirements for plywood, and BS EN 636:2012+A1:2015 covers plywood for dry, humid or exterior conditions.
- Start with exterior plywood: water-resistant melamine-fortified or phenolic (WBP) glue.
- Round the arris slightly, so the coating does not thin out on a sharp corner.
- Seal the edge with two or three coats, letting each soak in.
- Seal holes and cut-outs the same way before fitting hardware.
- Paint the edges with the faces, and inspect them first when you maintain the finish.
Film-faced and exterior panels are often edge-sealed at the mill; recoat every edge you cut. Our guide on how to seal plywood edges covers each panel type, and our exterior plywood page lists the build.
Laminated, profiled and shadow-gap edges
Laminated, profiled and shadow-gap edges are details for wall panels and furniture that make the edge part of the design. Each starts from a clean, calibrated edge.
- Laminate edge strips: high-pressure laminate glued to the edge to match a laminated face.
- Profiled edges: chamfers, round-overs and bullnoses cut with a router or moulder, then sealed.
- Shadow gaps: a small rebate along wall panel edges so joints read as deliberate lines.
- Textured edges: brushed or grooved edges, sealed to stop dirt pick-up.
The US Forest Products Laboratory’s Wood Handbook (FPL-GTR-282, 2021) explains why end grain takes up water and finish faster than side grain, which is why every one of these edges still needs sealing. Our guide to plywood wall panels covers panel joints.
Edge quality checks on incoming panels
Check plywood edges on arrival before they go to the edge bander or the paint line. Five checks show whether the edge will finish well.
- Core gaps: no open gaps or overlaps between core strips along the edge.
- Straight plies: plies parallel, no wavy layers.
- Glue lines: tight and even, no open or dry lines.
- Thickness: within the ordered tolerance at several points.
- Squareness: cut-to-size parts square and to size.
Our quality control checks panels before loading, and every shipment is photographed and filmed.
What this means for your order
Order plywood for its edge as well as its face: a stitched, calibrated core with a pale, even species makes exposed and banded edges finish cleanly. Send these lines with your request:
- Application and edge: exposed, banded, lipped or painted edges, and where.
- Core: white Styrax or Eucalyptus as standard.
- Face and grade: matched to the finish and an approved sample.
- Glue and emission: UF glue at E0 emission for interiors; phenolic (WBP) to your specification for exterior use.
- Size: full sheets 1220 × 2440 mm or 1250 × 2500 mm, or cut-to-size parts.
- Thickness and quantity: 3–40 mm, from one 40HC with mixed specifications by agreement.
Ask for free samples to test your edge bander or finish, and see our furniture plywood from Vietnam range. The pillar guide on how to finish plywood covers faces and edges together.
Buyer questions, answered
How do you finish the edges of plywood?
Sand the edge smooth and seal it if you want the plies to show, or cover it with iron-on veneer tape, PVC or ABS edge banding, or solid wood lipping. For a painted finish, fill the end grain and prime it before painting.
Why paint the edges of plywood?
The edge is end grain that takes up water and paint much faster than the face. Sealing and painting it stops moisture getting into the plies, prevents swelling and gives the edge the same look as the face.
Should I use wood filler or edge banding on plywood edges?
Use filler when the piece will be painted and the edge is not knocked often. Use edge banding when the edge will be stained, clear-finished or handled, because banding gives a face-matching, harder-wearing edge.
How do you hide plywood edges?
Cover them with veneer tape or solid lipping that matches the face, or join two panels with a mitre so no edge shows. PVC or ABS banding hides edges on painted or laminated furniture.
How do you seal plywood edges for outdoor use?
Seal every cut edge with two or more coats of an exterior primer, sealer or thin epoxy, worked into the end grain, before painting the faces. Use plywood with an exterior glue line and recoat edges you cut on site.
Can you leave plywood edges exposed?
Yes, on furniture made from panels with gap-free, even cores. Sand the edge smooth, ease the arris and seal it with the same clear finish as the faces.
What is the best wood filler for plywood edges?
A fine, water-based, sandable filler or a two-part filler that shrinks little. Apply it in thin layers, sand flush, and prime it before painting.
How do you paint plywood edges smoothly?
Fill the edge, let it dry and sand it flush, then apply two or three primer coats with a light sand between them until the edge feels as smooth as the face. Paint edges and faces together.
Is PVC or ABS edge banding better?
Both look alike on furniture. ABS contains no chlorine and is easier to recycle; PVC is usually cheaper. Either needs a hot-melt edge bander for a durable bond.
How thick should solid wood lipping be?
Thin lipping of a few millimetres looks like a fine edge and is planed flush. Thicker lipping protects table and shelf edges better and can be shaped or rounded.