
To check the quality of plywood, read the edge for even plies without gaps, tap the face for hollow spots, weigh one sheet, lay it flat, caliper the thickness and meter the moisture. Then test the glue the right way for its type and match the face and label to the order. Minh Thanh Plywood sets out ten tests, the tools and what each failure means.
How to check the quality of plywood: the ten tests
Ten tests check plywood quality, from the edge of the sheet to the label on the pack, and eight of them need only hand tools. Run them on the approved sample first, then on sheets from the delivery, and write each result down against the order.
| No. | Test | Tool | What good looks like |
|---|---|---|---|
| 1 | Edge plies and core gaps | Eyes, torch | Even plies, no gaps or overlaps |
| 2 | Tap test for voids | Knuckle or coin | Same solid sound everywhere |
| 3 | Weight | Scale | Within a few percent of size × density |
| 4 | Flatness | Flat table, straight edge | Lies flat, no rock or bow |
| 5 | Thickness | Caliper | Five points within order tolerance |
| 6 | Moisture | Pin meter | About 8–12 % for furniture plywood |
| 7 | Glue bond | Chisel, soak | Wood fibre tears, glue line holds |
| 8 | Face | Daylight, sample | Matches the grade pair and sample |
| 9 | Soak or boil | Water, pot | Glue class survives its own test |
| 10 | Label and documents | Order, packing list | Same spec, lot and certificates |
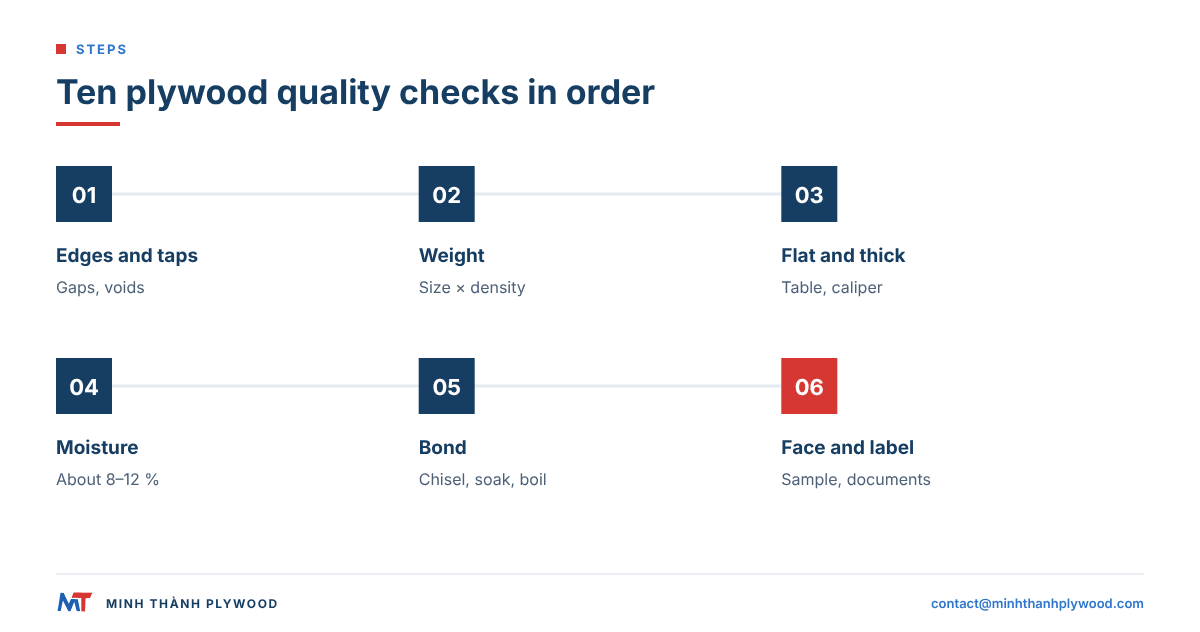
The order matters. Tests 1 to 6 take minutes per sheet and reject most bad panels before you spend time on bond tests. Test 10 links every sheet to the order and the paperwork.
How to tell good plywood from bad at a glance?
In plywood checking, good plywood shows its quality at the edge and on the face before any tool comes out: closed, even plies, a flat sheet, square corners and a sanded face without open defects. Bad plywood gives itself away in the same places.
Plywood checking: good signs and bad signs
Four signs of good plywood:
- Edges. Each ply a straight, even line, the same number of plies at every edge, no dark glue gaps.
- Corners. Square and sharp, not crushed or chipped.
- Face. Even colour for the grade, sanded smooth, patches tight and level.
- Sheet. Flat when laid on a table; the same feel of weight as the next sheet.
Four signs of bad plywood:
- Core gaps or overlaps visible as holes or bumps at the edge.
- Blisters or bubbles on the face that give under a thumb.
- Warping: the sheet rocks on a table or bows along its length.
- Thin spots where the face has been sanded through to the layer below.
A glance does not replace the tests that follow, but it tells you which sheets to test first.
Test 1: Read the edge for even plies and core gaps
Look along all four edges of the sheet: every ply should be a straight, even line, with no gaps between core veneers and no doubled veneer where two pieces overlap. The edge is a cross-section of the whole panel.
What to count and look for:
- Ply count. The same number of plies at every edge. An 18 mm furniture panel typically has 11 to 13 plies; a 3–5 mm thin panel at Minh Thanh is always 5-ply.
- Core gaps. A dark slot where two core veneers did not meet. Short gaps at the edge often run into the sheet.
- Overlaps. A ply that thickens or doubles; it shows on the face later as a ridge.
- Balance. Plies matched in pairs either side of the centre, so the sheet stays flat.
Shine a torch along the edge in a dim room; small gaps show as shadows. Gaps and overlaps come from loose lay-up. Minh Thanh stitches core layers both horizontally and vertically to keep the core closed.
Test 2: Tap the face to find hidden voids
Tap the face of the sheet every 20 to 30 cm with a knuckle or a coin: a solid panel sounds the same everywhere, and a void or an unbonded area sounds hollow. It is the quickest test for what the edge cannot show.
How to run it:
- Lay the sheet flat on a solid surface.
- Tap in a grid across the whole face, row by row.
- Mark any hollow-sounding spot with chalk.
- Press the marked spot with a thumb; a blister gives, a void under a solid face does not.
A hollow spot means a core gap, a missed glue spread or a blister from steam during pressing. A few small marks on a commercial panel may be within the grade; any on a furniture panel that will be routed or edge-drilled are a reject.
Test 3: Weigh one sheet against its density
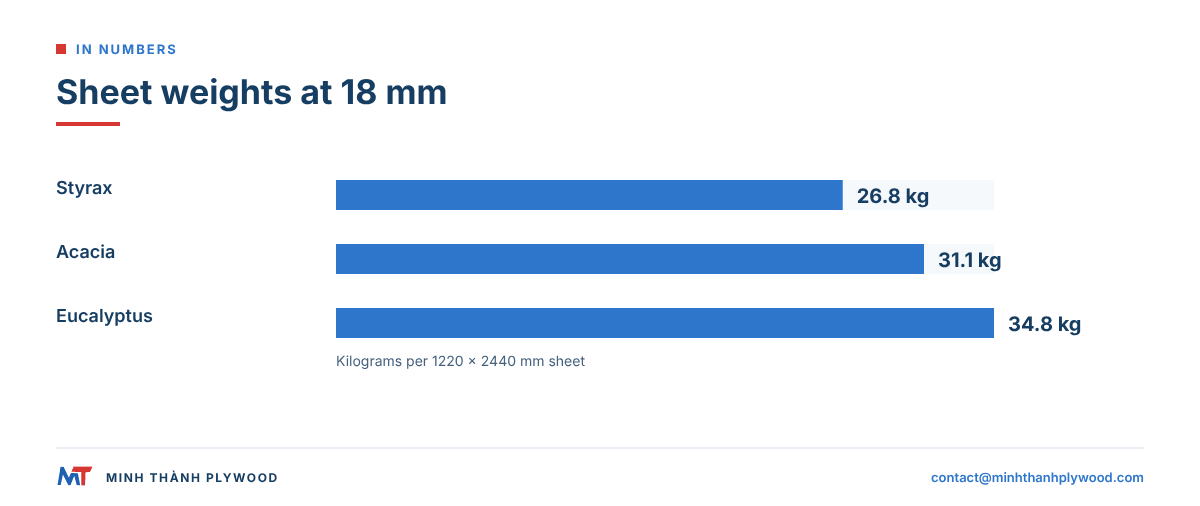
Weigh one sheet and compare it with length × width × thickness × the declared core density: the result should be within a few percent. A 1220 × 2440 × 18 mm sheet weighs about 26.8 kg on a Styrax core, 31.1 kg on Acacia and 34.8 kg on Eucalyptus.
| Thickness | Styrax core, 500 kg/m³ | Acacia core, 580 kg/m³ | Eucalyptus core, 650 kg/m³ |
|---|---|---|---|
| 9 mm | 13.4 kg | 15.5 kg | 17.4 kg |
| 12 mm | 17.9 kg | 20.7 kg | 23.2 kg |
| 15 mm | 22.3 kg | 25.9 kg | 29.0 kg |
| 18 mm | 26.8 kg | 31.1 kg | 34.8 kg |
What the scale tells you:
- Much lighter than expected: voids in the core, a lighter species than ordered, or an under-thickness sheet.
- Much heavier than expected: a denser species, more glue, or wet panels; check moisture next.
- Sheets that differ from each other: mixed cores in one order.
Weight is not a quality grade by itself. A light Styrax panel and a heavy Eucalyptus panel can both be good; they are different builds for different parts.
Test 4: Lay the sheet flat to check for warping
Lay the sheet face up on a flat table or floor: a flat panel touches everywhere and does not rock when you press the corners. Then lay a straight edge across both diagonals and along each side.
Read what you find:
- Corner lifts or the sheet rocks: twist, from an unbalanced build or uneven drying.
- Bow along the length: often moisture difference between the two faces.
- Cup across the width: one face drier than the other, or a thin face on one side only.
Check flatness at room conditions, not straight from a cold or damp container; give the panels a day to adjust. Minh Thanh presses furniture panels twice as standard: the core board is pressed and calibrated, then face and back are pressed on. That is what keeps a furniture panel flat for CNC work.
Test 5: Measure thickness with a caliper at five points
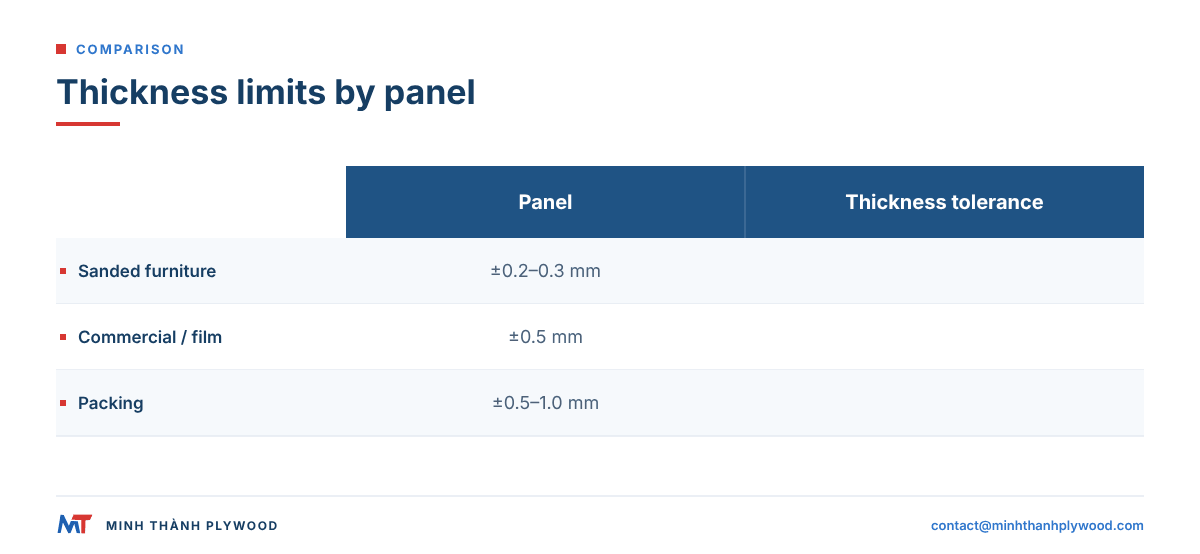
Measure thickness with a caliper at the four corners and the centre of each sheet, at least 25 mm in from the edge, and compare every reading with the order tolerance. One reading per sheet is not a test.
| Panel type | Thickness tolerance at Minh Thanh |
|---|---|
| Sanded furniture plywood | ±0.2–0.3 mm, down to ±0.2 mm |
| Commercial and film-faced | ±0.5 mm |
| Packing plywood | ±0.5–1.0 mm |
| Length and width, all panels | ±2 mm |
Thickness spread within one sheet matters as much as the average. A sheet that reads 18.2 mm at one corner and 17.6 mm at another will not fit a groove or a hinge setting, even though its average looks right. The plywood thickness guide sets the nominal and actual sizes side by side.
Test 6: Read moisture with a pin meter
Push a pin moisture meter into the face of several sheets, set to the wood species or to plywood: furniture plywood should read about 8–12 % moisture content. Veneers and panels at Minh Thanh are dried to that range for dispatch.
How to read the result:
- 8–12 %: normal for furniture plywood leaving the factory.
- Higher readings: panels stored wet, rained on, or dried too little; expect warping and glue problems as they dry.
- Very different readings between sheets: packs exposed unevenly in transit; check the wrapping and the container.
Take readings on sheets from the top, middle and bottom of a pack, and on both faces. A meter reads only the outer plies, so a high reading near an edge is an early warning, not a final result.
Test 7: Test the glue bond with a chisel or knife
Cut a small strip from an offcut and lever the plies apart with a chisel: in a good bond the wood tears, leaving fibre on both sides, and the glue line itself holds. Clean, smooth glue surfaces with no wood fibre mean a weak bond.
Steps on an offcut:
- Cut a strip about 25 mm wide across the sheet.
- Start a chisel at one glue line from the end of the strip.
- Lever the plies apart and look at both broken faces.
- Judge the fibre: a good bond leaves torn wood over most of the surface; a poor bond leaves bare glue or bare veneer.
- Repeat on two or three glue lines, including one near the centre.
This field test does not give a grade, but it separates good and bad bonds quickly. A laboratory shear test to EN 314-1 gives the number when the contract needs one.
Test 8: Check the face against the grade and the sample
Check the face in daylight against the approved sample and the grade pair on the order: colour, figure, patches, splits and sanding. The sample is the reference, not the grade name alone.
What to look at on the face:
- Grade pair. Face and back to the grades ordered, such as B/B on poplar or D+/D on birch.
- Colour and figure. Within the range of the sample; mixed colours in one pack show on a finished job.
- Patches and plugs. Tight, level and the number the grade allows.
- Sanding. Even sheen, no sand-through to the next layer and no chatter marks.
- Open defects. Splits, open knots and glue stains that the grade does not allow.
- Knot size by US grade. Under PS 1, a C-grade softwood face allows tight knots up to 1.5 in and a D-grade face allows knots up to 2.5 in, per Forest Plywood, plywood grades, read in October 2026. A knot over the limit is a grade failure.
Minh Thanh faces are sanded and polished, and both faces are UV-ready to the standard customers need to apply their own UV coating. The plywood grades guide explains the letter pairs.
Test 9: Soak or boil a sample, but only for the right glue
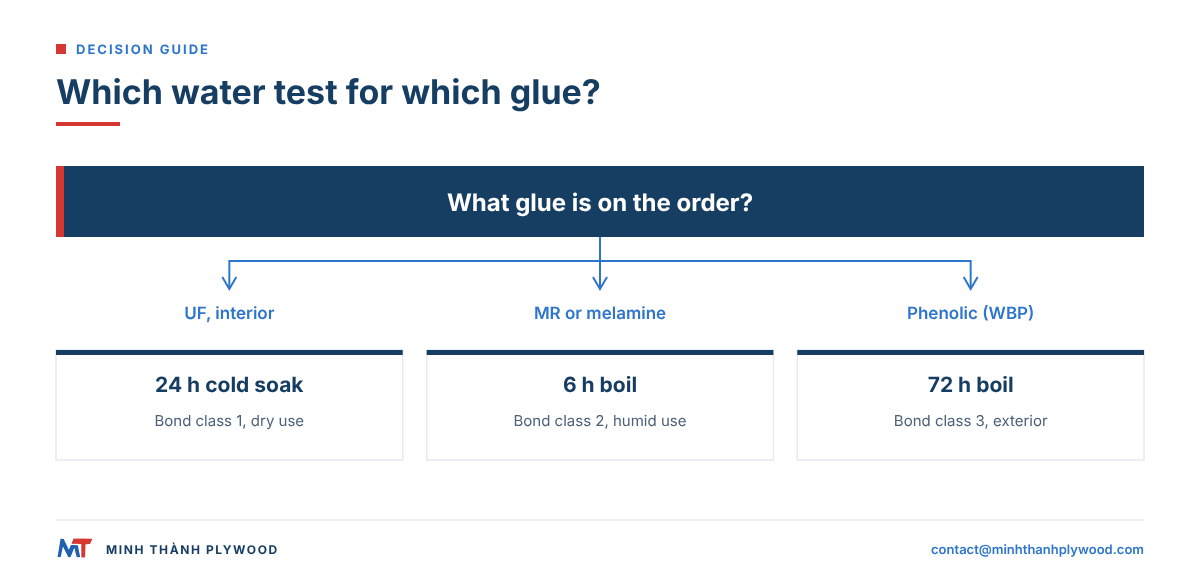
A soak or boil test checks the glue against water, and the test must suit the glue: exterior phenolic (WBP) plywood is built to survive boiling, and interior UF-glued plywood is not. Boiling a UF furniture panel and calling it bad is a common mistake.
The European bond classes in BS EN 314-2:1993 set the right test for each use:
| Bond class | Use | Pre-treatment before the bond test |
|---|---|---|
| Class 1 | Dry interior | 24 hours in water at about 20 °C |
| Class 2 | Humid interior | 6 hours in boiling water |
| Class 3 | Exterior | 4 hours boiling, drying, 4 hours boiling, or 72 hours boiling |
A home version: put a 100 × 100 mm sample in boiling water for a few hours for a phenolic panel, or a cold soak for 24 hours for an interior panel. Dry it, then try to split the plies with a chisel. Delamination after the test the glue is built for is a fail.
Minh Thanh’s furniture plywood uses UF glue at E0 emission. MR, melamine-fortified and phenolic (WBP) bonds are made to the customer’s specification, so the soak or boil test follows the bond on the order.
Test 10: Match the label and the documents
Match the label on each pack and the documents to the order: specification, lot and certificates. Quality on paper and quality in the sheet must be the same panel.
What to check:
- Pack label. Order number, thickness, grade, size and sheet count, against the packing list.
- Emission label. For US orders, panels carry the TSCA Title VI label: producer, lot, certifier number TPC-43 and “TSCA Title VI compliant”.
- Invoice and bill of lading. For US orders both state TSCA Title VI compliance.
- Certificates. CARB P2 / TSCA Title VI as ICTT mill no. 23024, ISO 9001:2015 for plywood manufacturing (KAC25/0185) and TCVN 11902:2017 for veneer-faced plywood (VietCert 141.1-VNC-HC).
- Test reports. The emission report’s panel, method and laboratory; reports identify UF resin at E0 grade.
Grade stamp and buyer mistakes
A US grade stamp packs the whole specification onto one panel. Read it in this order (APA, how to read a trademark stamp, read in October 2026):
- Panel grade. The face and back veneer pair, such as A-B or B-C, or an end-use name such as Rated Sheathing. The face grade comes first.
- Bond classification. Exterior or Exposure 1, which says how much weather and moisture the glue line is built for. The X in the trade name CDX once meant exterior glue, but CDX panels are bond-classified Exposure 1, not Exterior; read the bond class on the stamp.
- Span rating. Two numbers such as 32/16: the maximum support spacing in inches for roof sheathing (left) and subfloor (right).
- Mill number and standard. The APA-member mill number and the product standard, PS 1. Check the mill number against the APA mill list, because copied stamps on imported panels exist.
- Hardwood plywood. Hardwood panels follow HPVA HP-1 and carry a face and back pair such as A-1 or B-2, plus the formaldehyde label (CARB or TSCA Title VI). The plywood grades guide explains the letter pairs.
Four buyer mistakes cost the most: buying the cheapest quote, ordering the wrong grade pair, skipping certification, and accepting a sample that is not the production run. Red flags on an offer: a price far under the market quote for the same thickness, core and glue; no lot number on the pack; no emission test report for the lot; and a certificate that names a different mill from the one shipping.
Minh Thanh’s six ASTM D6007 chamber tests, April 2025 to June 2026, on 9, 15 and 18 mm panels averaged 0.014–0.032 ppm. Three were run by Shanghai Hongjun and three by ICTT Vietnam. The limit for hardwood plywood with a veneer core is 0.05 ppm under 40 CFR 770.10.
What each plywood quality failure means
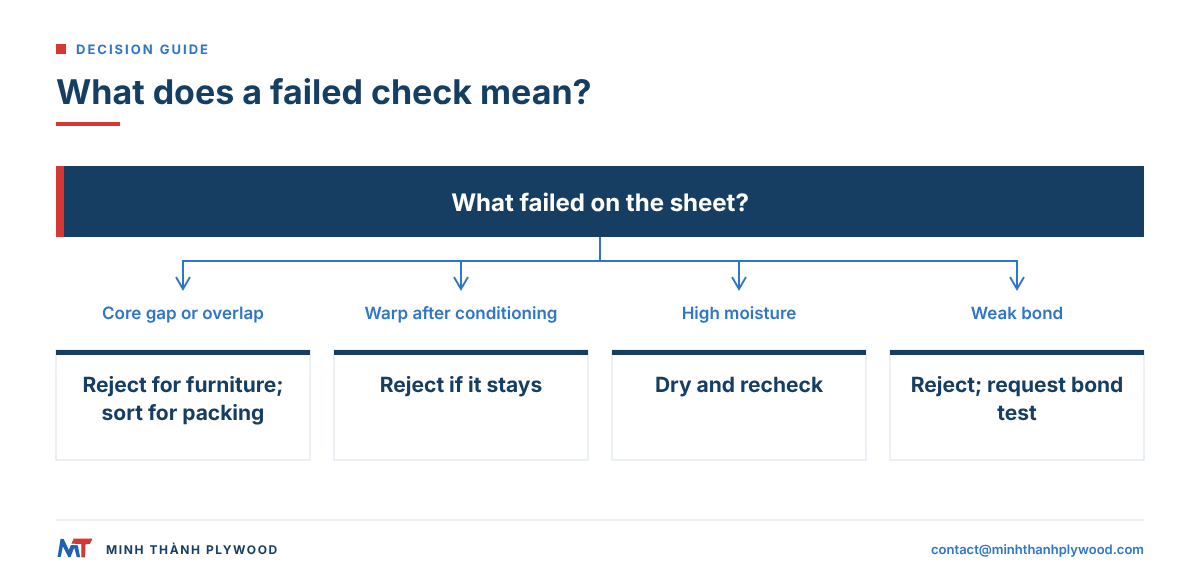
Each failed test points to one cause in production, and the cause decides what to do with the sheet: reject it, sort it to a lower use, or accept it within the grade.
| Failure | Usual cause | What to do |
|---|---|---|
| Core gap or overlap at the edge | Loose lay-up, no stitching | Reject for furniture; sort for packing |
| Hollow sound on tapping | Void, missed glue, steam blister | Reject if it is in a part to be machined |
| Under weight | Voids, lighter species, under thickness | Caliper and check core species |
| Warp, twist or bow | Unbalanced build, uneven drying | Condition 24 h; reject if it stays |
| Thickness out of tolerance | No core calibration, worn sanding | Reject for grooves and hardware |
| High moisture | Wet storage, short drying | Dry and recheck before use |
| Weak bond in the chisel test | Glue spread, press heat or time | Reject; ask for a bond test |
| Face below grade | Face selection, sanding through | Sort against the sample; claim the gap |
Record the failure with photos, the pack number and the readings. The plywood quality claims guide sets out how to raise a claim from these records.
How to check a plywood container from Vietnam before shipment
Check a plywood container from Vietnam before shipment through photos, video and readings from the mill, or through an inspection company at the factory before the container is sealed. The aim is to find any problem while the panels are still at the mill.
- Agree the checks in the order. Thickness points, moisture range, face against the sample and pack count.
- Ask for the pack photos. Edges, faces and labels of sample packs.
- Ask for readings on camera. Caliper and moisture meter on sheets pulled from different packs.
- Watch the loading. Photos and video of the packs going into the container and of the seal.
- Appoint an inspector for a first order or a large one, to check sheets and loading in person.
Every Minh Thanh shipment is photographed and filmed before loading, and the buyer gets the photos and video. Third-party testing to the buyer’s method, for example EN 717-1, is arranged through SGS on request.
What to check before ordering, by type of plywood
Each plywood type has its own weak point, so the checks before ordering change with the product. The table lists the first thing to check on the sample for seven common Vietnamese types.
| Plywood type | First check on the sample | Second check |
|---|---|---|
| Furniture plywood | Thickness at five points, flatness | Core gaps at the edge, face sanding |
| Birch-faced | Face grade pair, such as D+/D | Core at the edge: it is not birch |
| Engineered veneer (EV) | Colour against the reference | Same colour across sheets |
| Eucalyptus-faced or -core | Weight and stiffness | Face grade A/A, A/B or B/B |
| Commercial plywood | Core gaps, thickness ±0.5 mm | Glue type for the use |
| Film-faced | Film cover, no bubbles, sealed edges | Glue type, core gaps |
| Anti-slip | Pattern depth and grip, film bond | Edge sealing |
Vietnamese birch-faced plywood carries imported birch veneers on a white Styrax or Eucalyptus core. Its face grades are named D+, D and E; as a buying comparison D+ is close to B and D close to BB. The Vietnamese plywood quality verdict covers each line.
What this means for your order
Write the checks into the order so the mill builds to them and your inspection tests the same things. A furniture plywood line with its checks reads:
18 mm furniture plywood, white Styrax core stitched, pressed twice, UF glue at E0 emission, poplar B/B, 1220 × 2440 mm; thickness ±0.2–0.3 mm at five points, moisture 8–12 %, faces to approved sample; photos and video of loading.
Start with free samples: run tests 1 to 8 on them and keep one as the reference for the shipment. Minh Thanh’s minimum order is one 40HC, with production 15–45 days after the 30% deposit. Send your specification and the checks you plan to run, and we quote the furniture plywood to them.
Buyer questions, answered
How do I check the quality of plywood?
Run ten checks: edge plies and core gaps, a tap test for voids, sheet weight, flatness, thickness at five points, moisture, a glue bond test that suits the glue, the face against the sample, a soak or boil test for exterior glue, and the label and documents.
How can you tell good plywood from bad?
Good plywood has even, closed plies at every edge, sounds solid when tapped, lies flat, holds its thickness within tolerance and shows a clean, sanded face. Bad plywood shows gaps, overlaps, hollow spots, warping or a face that peels.
What is the boil test for plywood?
A sample is boiled in water and then checked for delamination. Exterior phenolic (WBP) plywood passes long boiling; interior UF-glued plywood is not built for it, so boiling a UF panel tells you nothing about its quality.
What moisture content should plywood have?
Furniture plywood should read about 8–12 % on a moisture meter at dispatch. Readings well above that mean the sheets were stored wet or dried too little and may warp in use.
How do I check plywood thickness?
Caliper each sheet at the four corners and the centre, at least 25 mm in from the edge, and compare with the order tolerance: ±0.2–0.3 mm for sanded furniture panels at Minh Thanh.
Why is my plywood lighter than expected?
Either the core species is lighter, such as Styrax against Eucalyptus, or the sheet has voids or is under thickness. Compare the weight with the declared core density and caliper the sheet.
How do I check the quality of a plywood container from Vietnam before shipment?
Ask for photos and video of the packs and the loading, caliper and moisture readings on camera, and faces against the approved sample; or appoint an inspection company to check before the container is sealed.
Is birch plywood from Vietnam good quality? What should I check before ordering?
Vietnamese birch-faced plywood is good for furniture with banded edges. Check the face grade pair, such as D+/D, against the sample, and check the core at the edge, since the core is not birch.
Is film-faced plywood from Vietnam good quality? What should I check?
From a specialist mill, yes. Check the core at the edge for gaps, the film for even cover with no bubbles, the edge sealing, and the glue type, which decides how many pours the panel survives.
What does a CARB P2 or TSCA Title VI label on plywood show?
It shows the producer, the lot, the certifier number and the words TSCA Title VI compliant. Minh Thanh panels for US orders carry this label, with certifier number TPC-43.
Can I check plywood quality at home?
Yes, for most tests. You need a tape, a caliper, a straight edge, a scale and a pin moisture meter; only the bond and emission tests need a laboratory.