
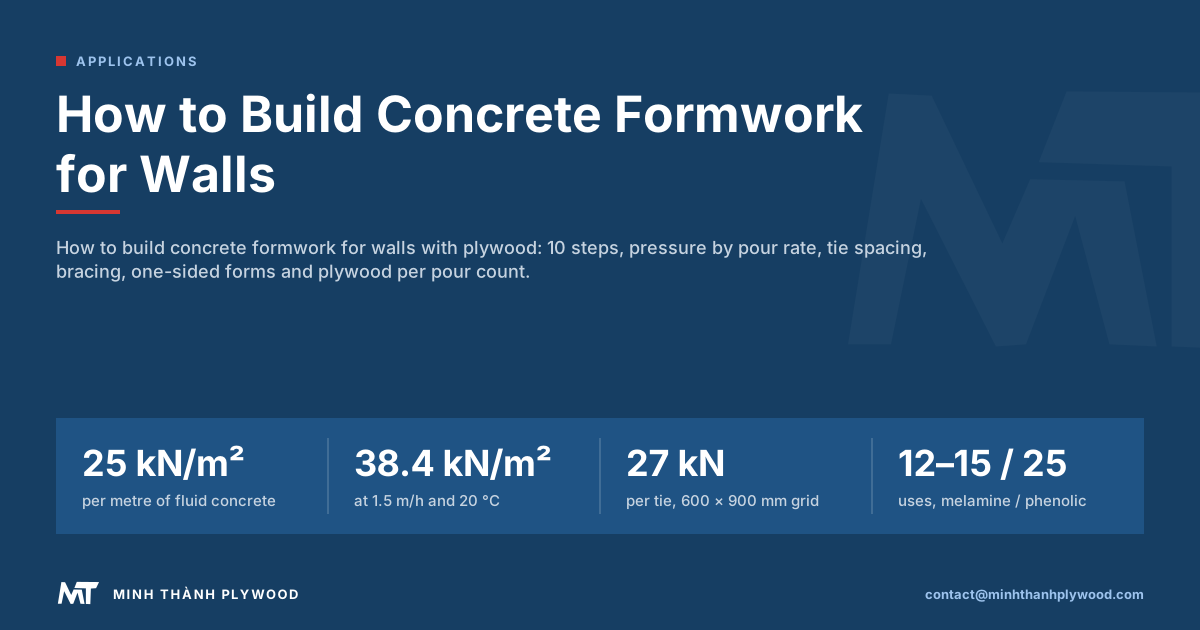
To build concrete formwork for a wall, you stand two faces of film-faced plywood on studs and walers, tie them together through the wall at a spacing set by the concrete pressure, brace them plumb, then pour at a rate the ties can take. Minh Thanh Plywood, a plywood manufacturer in Phu Tho, sets out the steps, the numbers and the plywood to buy for 1, 5 or 30 pours.
How to build concrete formwork for a wall: the short answer
You build concrete formwork for a wall from two plywood faces, stiffened by studs and walers, held apart and together by ties, and braced plumb. The concrete pressure sets the tie spacing and the pour rate, and the plywood choice sets the finish and the number of pours.
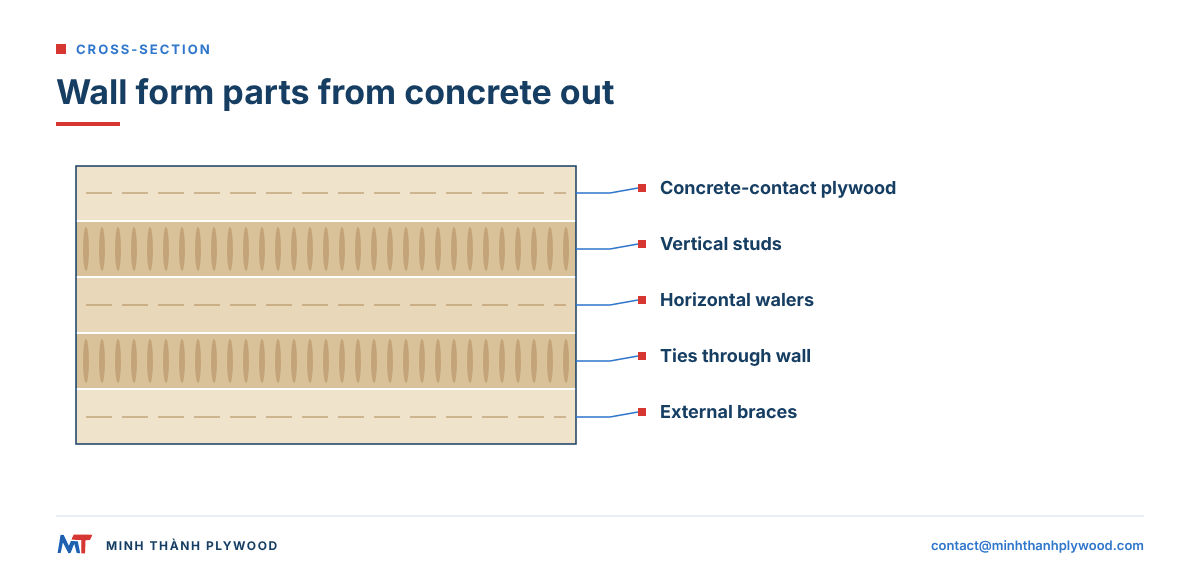
The parts of a plywood wall form, from the concrete outward:
- Skin: film-faced plywood, the concrete-contact face.
- Studs: vertical timber, LVL or H20 timber beams behind the skin.
- Walers: horizontal timbers or steel channels across the studs.
- Ties: rods or snap ties through the wall, holding the two faces together.
- Braces: props or push-pull braces holding the form plumb and resisting wind.
- Kicker or sole plate: fixes the bottom of the form in position.
- Working platform: for the pour, with a guard rail.
How to build simple slab and footing forms
A slab or footing form is a straight side board staked to the ground, level on top, with the stakes outside and braced against the push of the wet concrete. Use 2 × 4 boards for a slab 4 in thick, 2 × 6 or 3/4 in (18 mm) film-faced plywood strips ripped to depth for deeper footings and grade beams.
- Mark the outline with string lines and square it by measuring both diagonals.
- Cut the side boards to the slab depth. A 2 × 4 on edge is 3.5 in tall, enough for a 4 in slab once the base is trimmed. Use 2 × 6 or plywood strips above that.
- Set the boards on edge inside the string line, top edge at the finished surface.
- Drive stakes outside the boards at least every 32 in, or every 24 in for a slab 12 in thick or on loose soil. Nail through the stake into the board.
- Add diagonal 2 × 4 kicker stakes between the main stakes, so the concrete cannot push the board out and curve the slab edge.
- Set the slope: for drainage, a slab outdoors falls at least 2%, which is 1/4 in per ft.
- Coat the inside face with a release agent made for concrete, then check level, line and a clean base.
- Order the concrete by volume with 10% extra. A 10 × 10 ft slab 4 in thick holds 10 × 10 × (4 ÷ 12) ÷ 27 = 1.23 yd³, so order 1.36 yd³.
- Pour, screed and finish, then leave the forms on for at least 24 hours before stripping.
The same rules scale up. Walls and tall footings push much harder than a slab, so a slab form with stakes every 32 in is not enough for a wall; the ties, walers and pour-rate tables below take over. For slabs on a deck rather than on the ground, see our guide to slab formwork plywood.
Wooden concrete wall forms: what to prepare before you build
Wooden concrete wall forms need a drawing, a pressure figure and the right materials on site before the first sheet stands. Prepare these:
| Item | What to settle |
|---|---|
| Wall drawing | Length, height, thickness, openings, finish class |
| Pour plan | Pour height, rate of rise, concrete mix and temperature |
| Form design | Skin thickness, stud and waler spacing, tie spacing, braces |
| Plywood | Thickness, film, bond, sheet size, quantity |
| Ties | Type, rated working load, cones or sleeves |
| Release agent | Type compatible with the film |
| Sealant | For cut edges and holes |
The formwork ties and accessories guide covers tie types, walers and props.
How to build concrete forms with plywood: 10 steps
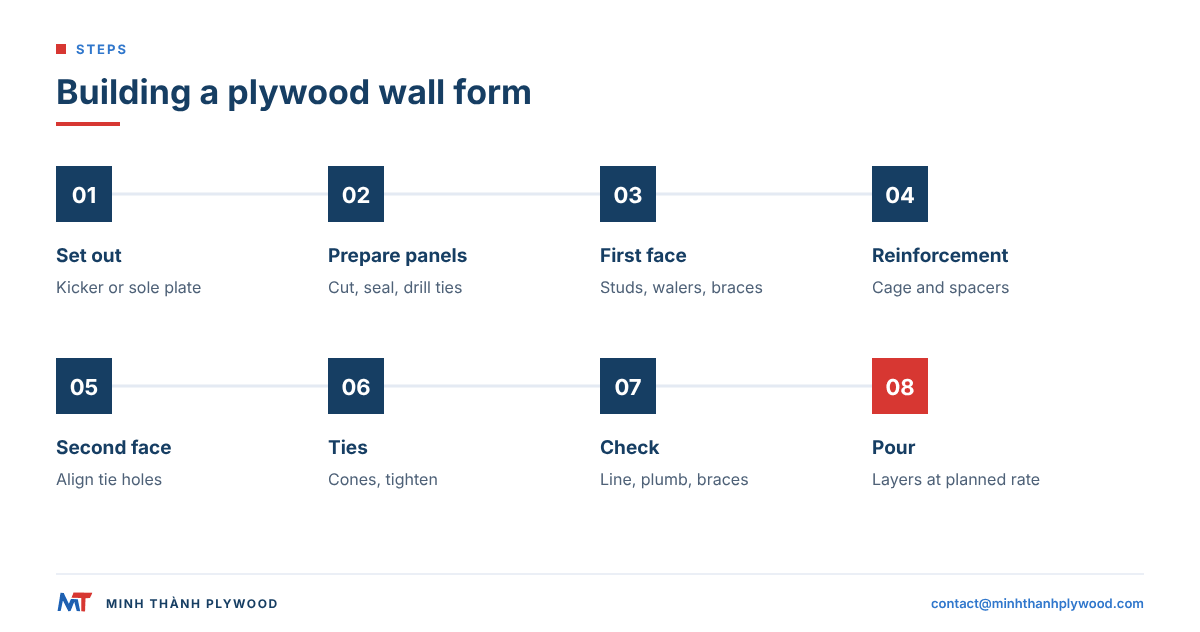
To build concrete forms with plywood, set out the wall, prepare and seal the panels, stand the first face, place the reinforcement, stand the second face, fit the ties, brace plumb, check and pour. Most walls follow this order in ten steps, from the base to the pour.
- Set out the wall line on the footing or slab and fix a kicker or sole plate.
- Prepare the panels: cut the plywood, seal every cut edge, drill tie holes at the designed positions and seal them.
- Fix studs to the back of each sheet at the designed spacing, face grain across the studs.
- Coat the film with release agent.
- Stand the first face on the kicker, fix the walers and brace it plumb.
- Place the reinforcement and any boxes for openings, with spacers for cover.
- Stand the second face, aligning the tie holes with the first.
- Fit the ties with cones or sleeves and tighten to the walers.
- Check line, plumb, wall thickness, tie tightness, braces and a clean base.
- Pour in layers at the planned rate, vibrating each layer, with someone watching the form.
After the pour, strip when the engineer allows, clean the film, seal any damage and store the panels flat for the next pour.
How much pressure does concrete put on a wall form?
Fluid concrete pushes on a wall form like a liquid of about 25 kN/m³, so the pressure can reach 25 kN/m² for every metre of height. A slow pour lets the lower concrete stiffen and reduces the peak.
Full liquid head by pour height:
| Pour height | Full liquid head at the base | In US units |
|---|---|---|
| 1.2 m (about 4 ft) | 30 kN/m² | about 630 psf |
| 2.4 m (about 8 ft) | 60 kN/m² | about 1,250 psf |
| 3.0 m (about 10 ft) | 75 kN/m² | about 1,570 psf |
Calculation: 25 kN/m³ × height. In US units that is about 150 psf for every foot of fluid concrete, so a 10 ft pour puts about 1,500 psf on the base of the form (1 kN/m² = 20.9 psf). The pressure falls to zero at the top, which is why walers and ties sit closer near the bottom.
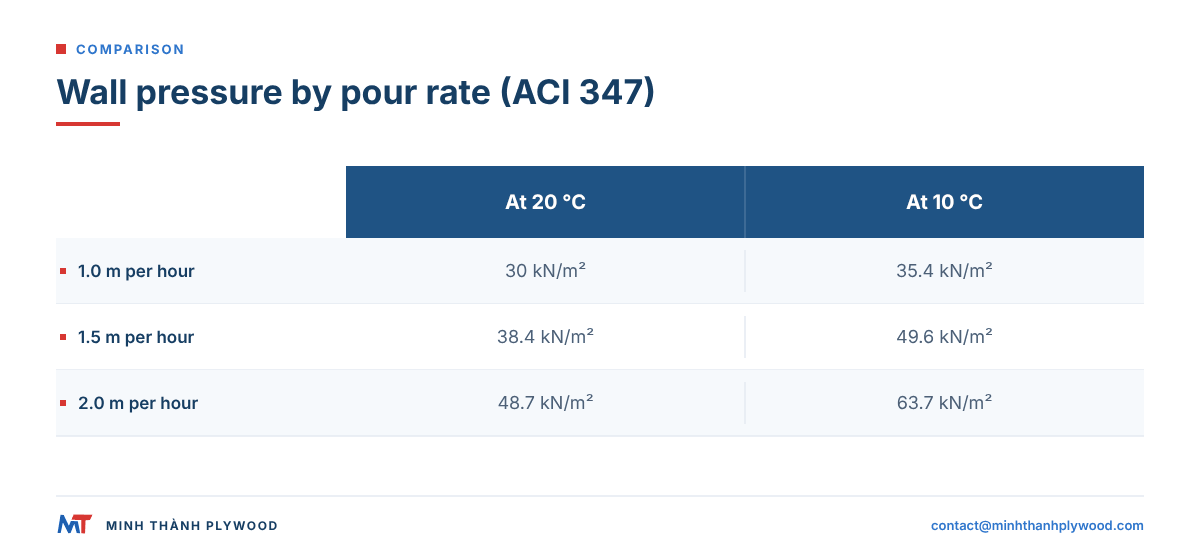
The American Concrete Institute guide ACI 347 gives a lower design pressure for walls under 4.2 m poured no faster than 2.1 m per hour: 7.2 + 785R ÷ (T + 17.8) kN/m². Here R is the rate of rise in m per hour and T the concrete temperature in °C; mix and weight factors adjust it for other concretes. The result never falls below 30 kN/m² and never exceeds the full liquid head. The ACI 347 guide sets the full rules.
Pour rate limits: how fast can you fill a wall form?
The faster the rate of rise and the colder the concrete, the higher the pressure on the form. Using the ACI 347 wall formula for ordinary concrete:
| Rate of rise | At 20 °C (68 °F) | At 10 °C (50 °F) |
|---|---|---|
| 1.0 m per hour (3.3 ft/h) | 30 kN/m² (minimum applies), about 630 psf | 35.4 kN/m², about 740 psf |
| 1.5 m per hour (4.9 ft/h) | 38.4 kN/m², about 800 psf | 49.6 kN/m², about 1,040 psf |
| 2.0 m per hour (6.6 ft/h) | 48.7 kN/m², about 1,020 psf | 63.7 kN/m², about 1,330 psf |
Calculation: 7.2 + 785 × R ÷ (T + 17.8), with a minimum of 30 kN/m² and a cap at the full liquid head.
What this means on site: the form designer states a maximum rate, for example 1.5 m per hour, and the pour plan holds to it. On a 10 m long, 200 mm thick wall, 1.5 m of rise per hour is 3 m³ of concrete per hour. A truck that empties faster than the plan allows is spread along the wall, not dumped in one place.
How far apart should form ties be?
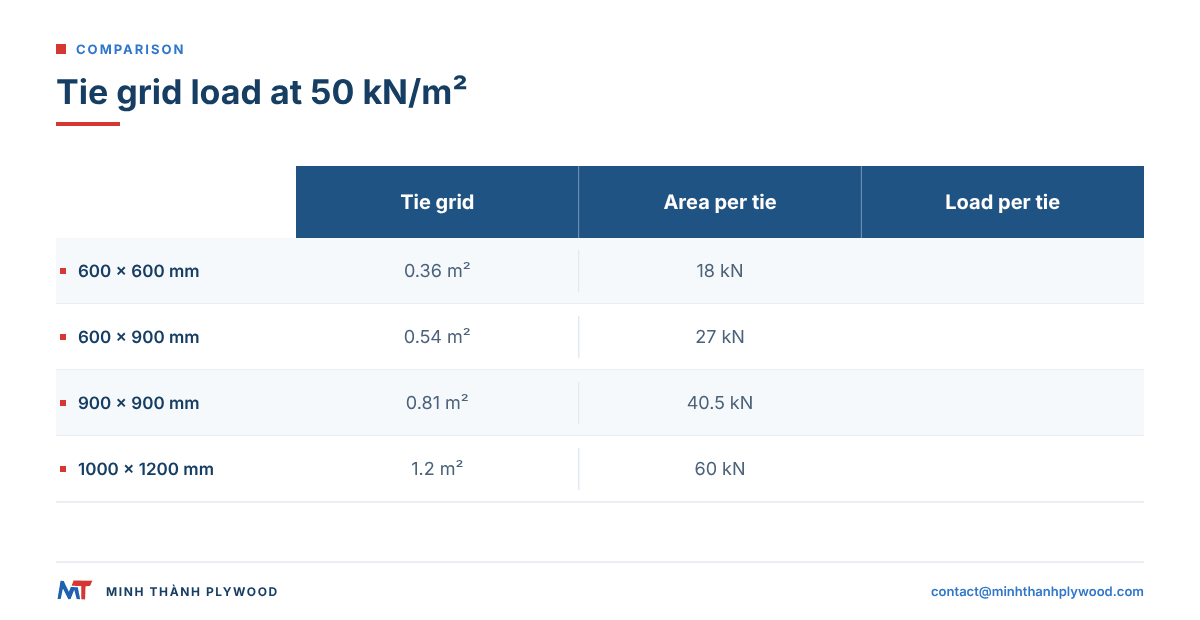
Form ties go on a grid where the load on each tie stays below its rated working load. The load on one tie is the design pressure times the area of form it holds.
Tie load at a design pressure of 50 kN/m²:
| Tie grid (horizontal × vertical) | Area per tie | Load per tie |
|---|---|---|
| 600 × 600 mm (24 × 24 in) | 0.36 m² | 18 kN (about 4,000 lbf) |
| 600 × 900 mm (24 × 36 in) | 0.54 m² | 27 kN (about 6,100 lbf) |
| 900 × 900 mm (36 × 36 in) | 0.81 m² | 40.5 kN (about 9,100 lbf) |
| 1000 × 1200 mm (39 × 47 in) | 1.2 m² | 60 kN (about 13,500 lbf) |
Calculation: pressure × horizontal spacing × vertical spacing; 50 kN/m² is about 1,040 psf, and 1 kN is about 225 lbf. Compare each figure with the rated working load printed by the tie maker. Pressure is highest at the base, so ties can be closer at the bottom rows and wider higher up, where the design allows.
Why tie holes decide how long the plywood lasts
Every tie passes through both plywood faces, and water and cement paste enter wherever the hole is not sealed. Drill holes cleanly, seal them before the first pour, use cones or sleeves so the rod never rubs the wood, and keep the same holes pour after pour.
Panel layout: how to plan the plywood on a wall
Lay out the plywood so the sheet joints, tie holes and openings form a pattern that suits the finish and wastes little. A drawn layout also lets the same panels return to the same place on the next pour.
- Sheet size: 1220 × 2440 mm suits walls about 2.4 m high; 1250 × 2500 mm suits 2.5 m pours and metric tie grids.
- Orientation: sheets standing upright on a wall with horizontal walers, face grain across the studs.
- Joints: aligned in a regular grid on fair-faced walls, so the joint pattern looks planned.
- Tie holes: on the same grid on every panel, so sheets swap without new holes.
- Openings: boxes fixed to one face with sealed edges where they meet the skin.
- Corners: one face runs past the other by the wall thickness plus the plywood thickness.
Number each panel and mark its position on the layout, so the form rebuilds in the same order each time.
Plywood concrete wall forms: which plywood should you buy?
For plywood concrete wall forms, buy film-faced plywood with a water-resistant bond, 18 mm for most walls and 21 mm for tall or fast pours. Choose the film and bond for the number of pours, not just the first one.
| Item | Pick | For |
|---|---|---|
| Thickness | 12–15 mm | Low walls, close studs, linings |
| Thickness | 18 mm (about 3/4 in) | Most walls |
| Thickness | 21 mm | Tall pours, fast rates, wider studs |
| Film | 120–135 g/m² standard | Normal walls |
| Film | From 135 g/m² premium | Fair-faced walls, more pours |
| Bond | Melamine-fortified | About 12–15 uses |
| Bond | Phenolic WBP | Up to about 25 uses |
| Core | Eucalyptus or Acacia | Dense hardwood cores |
Our film-faced plywood is made 12–21 mm thick to ±0.5 mm, in 1220 × 2440 and 1250 × 2500 mm sheets. Even thickness keeps sheet faces flush at the joints, which is what a fair-faced wall shows.
For the bond, the BSI record for BS EN 314-2:1993 sets the bonding-quality requirements, and BS EN 636:2012+A1:2015 covers plywood for dry, humid or exterior conditions.
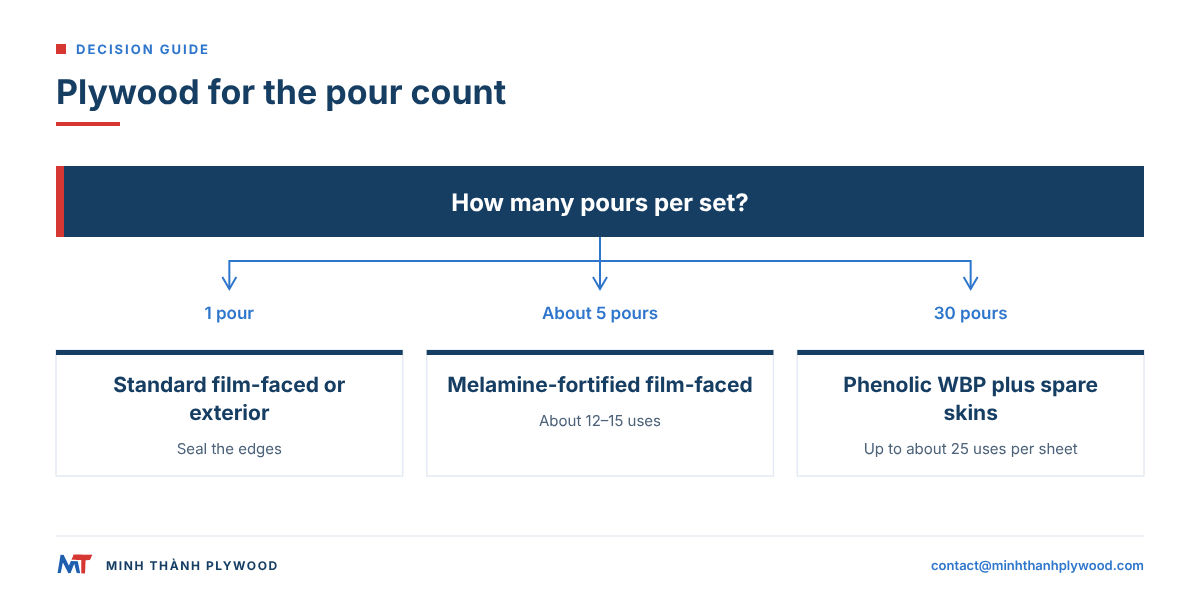
What plywood to buy for 1, 5 or 30 pours
The number of pours sets the plywood grade. Reuse counts for film-faced plywood assume proper handling, release agent and edge sealing.
| Pours planned | Plywood choice | Why |
|---|---|---|
| 1 pour | Standard film-faced or exterior plywood with sealed edges | Lowest cost for one use |
| 5 pours | Melamine-fortified film-faced plywood, standard film | About 12–15 uses gives a margin |
| 30 pours | Phenolic WBP film-faced plywood, premium film, plus a second set of skins | Up to about 25 uses per sheet, so plan replacement skins |
For 30 pours of the same wall, many contractors rent system frames and fix a plywood skin, then replace only the skin when it wears. Our guide on H20 timber beams covers beam-backed wall panels.
How to brace a wall form
Brace a wall form so it stays plumb during the pour and resists wind before it. Ties hold the two faces together; braces hold the whole form in position.
- Fix the base with a kicker, sole plate or anchors so the form cannot slide.
- Set push-pull props on one side at the designed spacing, anchored to the slab.
- Plumb the form with the props before the pour and check again during it.
- Add wind bracing on tall forms that stand empty for a while.
- Fit the working platform with a guard rail at the top.
Push-pull props both push and pull, so one line of props can hold the form plumb from one side. OSHA standard 1926.703 requires formwork to be designed, erected, supported, braced and maintained to carry the loads it will meet.
Single-sided formwork: forming against earth or an existing wall
Single-sided formwork forms a wall where only one face can be built: against earth, rock, sheet piles or an existing structure. With nothing to tie to, the concrete pressure goes into braced frames anchored to the base slab.
| Point | Double-sided wall form | Single-sided formwork |
|---|---|---|
| Pressure taken by | Ties through the wall | Braced frames and base anchors |
| Ties through the concrete | Yes | No |
| Base anchors | Light | Heavy, cast in ahead |
| Plywood skin | Both faces | One face |
| Typical uses | Most walls | Basements against piles, retaining walls, tunnels |
The plywood is the same as for a double-sided form, but the frames are heavier and the pour rate is often lower to keep the pressure down.
Wall formwork system or plywood-built forms?
A wall formwork system of ready-made frames is faster on long, repeated walls; plywood-built forms are cheaper to start and fit any shape. Many sites use both.
| Factor | Plywood-built forms | Wall formwork system |
|---|---|---|
| Start-up cost | Low | High, often rented |
| Shapes | Any, cut on site | Set modules, fillers for the rest |
| Labour per pour | More | Less |
| Pours per skin | Up to about 25 with phenolic WBP | Frames last many years; skins are replaced |
| Best for | Short runs, odd walls, one-off jobs | Long repeated walls, high-rise cores |
Forming concrete walls with plywood: common mistakes
Forming concrete walls with plywood goes wrong in a few repeated ways, each with a simple fix.
| Mistake | Result | Fix |
|---|---|---|
| Pouring faster than the design rate | Bulging, burst ties | Pour to the planned rate, in layers |
| Unsealed cut edges and tie holes | Swollen edges, short sheet life | Seal the day each cut is made |
| Too much release agent | Stains, dusty surface | Thin, even coat; wipe surplus |
| Ties without cones or sleeves | Torn tie holes | Use cones or sleeves on every tie |
| Mixed sheet thickness | Steps at joints | One thickness and tolerance per wall |
| Weak base fixing | Form slides, grout loss at the foot | Kicker or anchored sole plate |
How to check plywood wall forms on arrival and between pours
Check plywood on arrival against the order, then check each sheet between pours so damaged sheets do not reach a visible face.
On arrival:
- Thickness at several points per sheet, against the ordered tolerance.
- Size and squareness of sampled sheets.
- Film: colour, coverage and no bare patches.
- Edges: sealed, no open plies.
- Pack count against the packing list.
Between pours: clean the face, look for torn film, swollen edges and worn tie holes, reseal damage, and move worn sheets to hidden faces.
What should the site record for each wall form panel?
Keep a simple log per numbered panel: the pour count, the date of each pour, any damage found and repaired, and whether the panel is still fit for a fair-faced face. The log shows when a set will need new skins, so the next plywood order goes in before the last good sheets wear out. It also shows which handling habits cost the most sheets, such as striking at the corners or storing panels on wet ground.
How do you pour, finish and strip a wall form?
Pour in layers of about 300 to 600 mm, vibrate each layer into the one below, and strip only when the concrete has the strength the engineer requires. For a small wall or a slab, leave the forms on at least 24 hours; in cold weather, longer.
- Fill at the planned rate, never faster, with someone watching ties and braces.
- Level and finish the top with a straightedge screed, then trowel to the finish the drawing calls for.
- Keep the concrete damp and protected from frost and drying wind while it gains strength.
- Strip in the reverse order of building: braces, ties and cones first, then the walers, then the plywood, easing the sheet off the face rather than prying at the corner.
- Clean and recoat the film and seal any damaged edge before the next pour.
Use a release agent made for concrete. WD-40 or old oil may get a small job apart but leave stains and stuck panels; a proper release agent costs about US$30 for several jobs, less than the labour of prising stuck forms off.
Lumber for a low wall: 2 × 4 studs and walers work under 4 ft of height, and 2 × 6 above that, with 3/4 in plywood as the skin and a diagonal brace about every 4 ft. Taller walls follow the stud, waler and tie tables in this guide.
How much plywood does a wall form need?
A double-sided wall form needs plywood for both faces, so the skin area is twice the wall face area, plus ends and openings. Work out the area, then divide by the sheet.
Worked example for a wall 10 m long and 3.0 m high:
| Step | Value |
|---|---|
| Area of one face | 10 × 3.0 = 30 m² |
| Both faces | 60 m² |
| Sheets of 1250 × 2500 mm (3.125 m² each) | 60 ÷ 3.125 = 19.2, so 20 sheets |
| Sheets of 1220 × 2440 mm (2.98 m² each) | 60 ÷ 2.98 = 20.1, so 21 sheets |
Add sheets for wall ends, corners and opening boxes. If the same form is moved along a longer wall, buy for the longest single pour, not the whole wall: the form travels and the plywood is reused on each pour.
What to send in a wall formwork plywood RFQ
A wall formwork RFQ that states the wall, the finish and the pour target lets the mill quote the right build. Send these lines:
| Item | Your entry |
|---|---|
| Use | Basement walls, 3.0 m pours, fair-faced |
| Pours planned | 15 per set |
| Size | 1250 × 2500 mm |
| Thickness and tolerance | 18 mm, ±0.5 mm |
| Film | Brown, from 135 g/m² |
| Bond | Phenolic WBP |
| Core | Eucalyptus or Acacia |
| Edges | Sealed |
| Quantity and delivery | Sheets per month, FOB Hai Phong, CFR or CIF |
Our minimum order is one 40HC, with production 15–45 days after the deposit. Typical days at sea from Hai Phong are 15–25 to the Middle East, 30–40 to Northern Europe and 20–30 to the US West Coast, by carrier and route. Free samples let you test the film and edges before you order.
Buyer questions, answered
How do you build concrete wall forms with plywood?
Fix a kicker, stand one face of film-faced plywood on studs and walers, place the reinforcement, close with the second face, fit ties through both faces at the designed spacing, brace plumb and pour at the planned rate.
What thickness plywood is used for concrete wall forms?
Film-faced plywood of 18 mm is the usual wall form skin, with 21 mm for tall pours, fast placement or wider stud spacing. Small, low walls can use 12–15 mm on close studs.
How far apart should form ties be on a concrete wall?
Tie spacing comes from the design concrete pressure and the rated working load of the tie. Multiply the pressure by the area each tie carries and keep that below the tie's rated load; at 50 kN/m², a tie on a 600 × 900 mm grid carries 27 kN.
How fast can you pour concrete into a wall form?
As fast as the form design allows. The pressure on the form rises with the rate of rise and falls with warmer concrete, so the designer sets a maximum rate in metres per hour and the site pours to it.
How much pressure does concrete put on a wall form?
At most the full liquid head, about 25 kN/m² for every metre of fluid concrete. With a slow pour the lower concrete stiffens, so ACI 347 gives a lower pressure, such as about 38 kN/m² at 1.5 m per hour and 20 °C.
What is single-sided formwork?
Single-sided formwork forms a wall against earth, rock or an existing structure, so there is no opposite face to tie to. The concrete pressure goes into braced frames anchored to the slab or foundation instead.
How many times can plywood wall forms be reused?
Melamine-fortified film-faced plywood gives about 12–15 uses and phenolic WBP plywood up to about 25, with proper handling, release agent and edge sealing. Tie holes and edges decide how many pours a sheet reaches.
Can you build concrete forms with regular plywood?
For a single small pour, yes, with release agent and sealed edges. Uncoated plywood takes up water and cement paste, so the finish and the sheet both deteriorate after a few pours; film-faced plywood is made for repeat use.
How long should wall forms stay on?
Until the concrete has the strength the engineer requires for striking, which depends on the mix, the temperature and the wall. In normal weather wall forms often come off within a day or two; cold weather takes longer.
Can I use WD-40 or oil as a concrete form release agent?
Use a release agent made for concrete. WD-40 or old oil can get a small job apart, but it risks stains and stuck panels, and a proper release agent costs about US$30 for several jobs.
When can you remove concrete forms?
Leave small forms on at least 24 hours, and strip walls only when the concrete reaches the strength the engineer requires. Cold weather needs longer.
What is a wall formwork system?
A wall formwork system is a set of ready-made frames or beam panels with matching ties, clamps and braces, rented or bought from a formwork maker. It is faster on repeated walls; plywood-built forms fit odd shapes and short runs.